
Replacing your home’s windows is a significant investment, often one of the most substantial home improvement projects you’ll undertake. It’s a decision that impacts your home’s energy efficiency, comfort, security, and curb appeal for decades to come. While the allure of gleaming new panes and improved insulation is strong, rushing into a window replacement without proper preparation can lead to costly mistakes, buyer’s remorse, and a final product that doesn’t meet your expectations.
Taking the time to thoroughly plan and research beforehand is crucial to ensuring a smooth process and a satisfying outcome.
This guide will walk you through the essential steps to take *before* you commit to new windows. From understanding your motivations to selecting the right materials and professionals, we’ll cover everything you need to know to make an informed decision.
By the end, you’ll be well-equipped to approach your window replacement project with confidence, knowing you’ve done your homework and are on the path to enhancing your home’s performance and beauty.
Key Takeaways
- Define Your “Why”: Clearly identify the primary reasons for replacing your windows, whether it’s energy efficiency, aesthetics, comfort, or structural issues.
- Assess Your Current Windows: Conduct a thorough inspection of your existing windows to document problems and understand their current performance.
- Understand Window Types & Materials: Familiarize yourself with different window styles (double-hung, casement, etc.) And frame materials (vinyl, wood, fiberglass, aluminum).
- Research Energy Efficiency Ratings: Learn about U-factor, SHGC, and ENERGY STAR certifications to make informed choices about performance.
- Set a Realistic Budget: Factor in the cost of windows, installation, potential repairs, and any unexpected expenses.
- Choose the Right Professionals: Vet contractors thoroughly, obtain multiple quotes, and understand contracts before signing.
- Consider Local Climate & Regulations: Understand how your climate impacts window choices and if any building codes or HOA rules apply.
- Plan for Installation Disruption: Prepare your home and family for the installation process.
Understanding Your Motivation: Why Replace Your Windows?
Before you even start looking at different window styles or materials, the most critical first step is to understand why you’re considering this significant investment. Your motivations will shape every subsequent decision, from the type of window you choose to the contractor you hire. Without a clear understanding of your goals, you risk overspending on features you don’t need or overlooking critical issues that will continue to plague you after installation.
Identifying The Core Issues
Take a moment to honestly assess the performance and condition of your current windows. Are they:
- Drafty and Inefficient? Do you feel cold air seeping in during winter or hot air during summer? High energy bills are often a direct result of poor window insulation. Look for visible signs of air leaks around the frames and sashes.
- Difficult to Operate? Do windows stick, refuse to open or close, or have broken mechanisms? This can be a sign of warping, rot, or wear and tear.
- Damaged or Deteriorated? Is there visible rot in wooden frames, cracked or fogged glass (indicating seal failure), or corroded hardware? These are clear indicators that replacement is necessary.
- Outdated or Aesthetically Unpleasing? Do your windows simply not match your home’s style or your personal taste? While aesthetics are important, they should ideally be addressed alongside functional concerns.
- Causing Condensation Issues? Persistent condensation between panes suggests a failed seal and compromised insulation.
Prioritizing Your Needs
Once you’ve identified the problems, prioritize them. For most homeowners, energy efficiency and comfort are paramount. Saving money on utility bills and enjoying a more stable indoor temperature are often the primary drivers for window replacement. Following closely are durability, maintenance, and security. Finally, aesthetics and curb appeal play a significant role, especially if you plan to sell your home in the future.
- Example: If your primary concern is high heating bills, you’ll want to focus on windows with low U-factors and consider triple-pane options. If you dread scraping and painting, low-maintenance materials like vinyl or fiberglass will be more appealing.
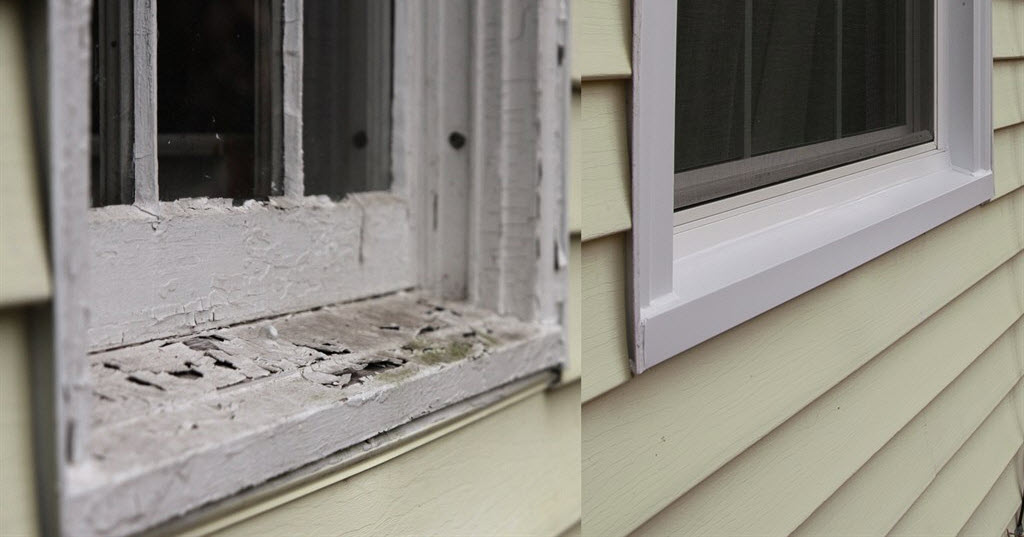
Credit: thebco.com
Assessing Your Current Windows: A Detailed Inspection
With your motivations clarified, the next step is to conduct a thorough inspection of your existing windows. This isn’t just about noting what’s wrong; it’s about gathering detailed information that will help you make informed decisions and communicate effectively with contractors.
Documenting Existing Problems
Walk around your entire house, inside and out, and meticulously document the condition of each window. Use a checklist or a notebook to record:
- Window Type: (e.g., double-hung, casement, picture, slider)
- Location: (e.g., living room, master bedroom, kitchen)
- Frame Material: (e.g., wood, aluminum, vinyl)
- Visible Damage: Rot, cracks, peeling paint, warping, corrosion.
- Operational Issues: Sticking, difficult to open/close, broken locks or hardware.
- Glass Condition: Cracks, chips, fogging between panes (seal failure).
- Drafts: Feel for air leaks around the frame and sash.
- Condensation: Note any recurring condensation issues.
Understanding Your Home’s Architecture And Needs
Consider how each window functions within your home.
- Sun Exposure: Which windows receive direct sunlight throughout the day? This impacts the type of glass coating (Low-E) and tinting you might need to manage heat gain.
- Ventilation: Which windows are crucial for cross-ventilation? If you rely on opening windows for cooling, ensure replacements maintain or improve airflow.
- Noise Levels: Are certain rooms exposed to significant street noise? Consider windows with better soundproofing qualities.
- Accessibility: Are any windows difficult to reach or clean? This might influence your choice of opening mechanisms or styles.
Measuring For Replacement (preliminary)
While precise measurements will be taken by the installer, it’s helpful to get a rough idea of your window sizes. Measure the rough opening (the framed space in the wall where the window sits) from stud to stud horizontally and from sill to header vertically. Note these rough dimensions. This will give you a preliminary understanding of standard window sizes and help you discuss options with professionals. Remember, most replacement windows are ordered to fit the existing rough opening, often installed as “insert” or “pocket” replacements.

Credit: gealanwindows.com
Exploring Window Types And Materials
The world of windows offers a diverse range of styles and materials, each with its own set of advantages and disadvantages. Understanding these options is key to selecting windows that not only perform well but also complement your home’s aesthetic.
Common Window Styles
- Double-Hung Windows: These are perhaps the most traditional style, featuring two sashes that slide vertically. Both sashes can typically tilt inward for easy cleaning. They offer good ventilation as you can open the top, bottom, or both.
- Casement Windows: These windows crank open outward, similar to a door. They offer excellent ventilation and a clear, unobstructed view when closed. They are also known for their airtight seal when locked.
- Awning Windows: Hinged at the top and opening outward from the bottom, awning windows are excellent for providing ventilation during rainstorms as the awning shape deflects water. They are often used in basements or above other windows.
- Hopper Windows: Similar to awning windows but hinged at the bottom and opening inward from the top. They are common in basements and provide ventilation while offering security.
- Sliding Windows: These windows operate horizontally, with one or more sashes sliding past each other. They are a good option for wide openings where vertical sashes might be impractical.
- Picture Windows: These are fixed windows that do not open. They are designed to maximize natural light and offer expansive views. They are often combined with operable windows for ventilation.
- Bay and Bow Windows: Bay windows project outward from the house, creating a nook and increasing interior space. Bow windows are similar but feature a more curved, segmented appearance. Both can add significant architectural interest and light.
Popular Frame Materials
The material of your window frame significantly impacts its durability, maintenance requirements, energy efficiency, and cost.
- Vinyl: Vinyl windows are the most popular choice for replacement due to their affordability, low maintenance, and good energy efficiency. They are resistant to rot and corrosion and come in various colors. However, they can warp or become brittle in extreme temperatures over time and may not be as structurally strong as other materials for very large windows.
- Wood: Wood windows offer a classic, warm aesthetic and excellent insulation properties. They can be painted or stained to match any décor. However, wood requires significant maintenance to prevent rot, warping, and insect damage, especially in humid or wet climates. They are also generally more expensive than vinyl.
- Fiberglass: Fiberglass windows are known for their strength, durability, and excellent energy efficiency. They are resistant to warping, cracking, and corrosion and can mimic the look of wood without the high maintenance. Fiberglass frames are also very stable in extreme temperatures. They are typically more expensive than vinyl but often less than high-end wood.
- Aluminum: Aluminum windows are strong, durable, and low-maintenance. They are often used in modern or commercial buildings. However, aluminum is a poor insulator, leading to significant heat transfer unless it incorporates a thermal break. This makes them less ideal for energy efficiency in residential settings unless specifically designed with advanced features.
- Composite: Composite windows are made from a blend of materials, often wood fibers and plastics. They aim to offer the look of wood with improved durability and lower maintenance. Performance and cost can vary widely depending on the specific blend.
Material Comparison Table
To help visualize the differences, consider this comparison:
| Material | Pros | Cons | Typical Cost (Relative) | Maintenance Level |
|---|---|---|---|---|
| Vinyl | Affordable, Low Maintenance, Good Energy Efficiency | Can warp/fade over time, Limited aesthetic customization, Less structural strength | $ | Low |
| Wood | Aesthetic Appeal, Excellent Insulation, Customizable | High Maintenance (rot, pests, painting), Expensive, Can warp | $$$ | High |
| Fiberglass | Durable, Strong, Energy Efficient, Low Maintenance, Stable | More Expensive than Vinyl, Limited color options (though improving) | $$ | Low |
| Aluminum | Strong, Durable, Low Maintenance, Modern Look | Poor insulator (unless thermally broken), Can corrode, Less energy efficient | $$ | Low |

Credit: www.windowworldtampa.com
Understanding Energy Efficiency Ratings
Windows play a critical role in your home’s overall energy performance. Understanding key ratings will empower you to choose windows that reduce your energy bills and improve comfort. Look for the ENERGY STAR® label on windows, which indicates they meet strict energy efficiency guidelines set by the U.S. Environmental Protection Agency.
Key Ratings To Know
- U-Factor: This rating measures how well a window prevents heat from escaping your home. It’s expressed as a number between 0.15 and 1.0. The lower the U-factor, the better the window’s insulating capability. For colder climates, a lower U-factor is more important. For example, a window with a U-factor of 0.25 is a better insulator than one with a U-factor of 0.40.
- Solar Heat Gain Coefficient (SHGC): This rating measures how well a window blocks heat caused by sunlight. It’s expressed as a number between 0 and 1. The lower the SHGC, the less solar heat is transferred into your home. This is particularly important in warmer climates or for windows that receive direct, intense sunlight, as it helps reduce cooling costs. In very cold climates, a slightly higher SHGC might be desirable on south-facing windows to allow some passive solar heating during winter.
- Visible Transmittance (VT): This rating measures how much visible light passes through the window. It’s expressed as a number between 0 and 1. A higher VT means more natural light enters your home. While important for daylighting, VT should be balanced with U-factor and SHGC to maintain energy efficiency.
- Air Leakage (AL): This rating indicates how much air passes through the window’s joints and seals. It’s expressed in cubic feet per minute per square foot (cfm/ft²). The lower the AL rating, the less air will leak through the window. Look for ratings of 0.3 cfm/ft² or lower.
Energy Star® Zones
ENERGY STAR® categorizes the U. S. into different climate zones, providing specific recommendations for window energy performance in each. Understanding your zone helps you select windows optimized for your local climate.
- Northern Zone: Requires the lowest U-factors for maximum heat retention.
- North-Central Zone: Moderate requirements for U-factor and SHGC.
- South-Central Zone: Focuses on moderate SHGC to reduce cooling loads.
- Southern Zone: Requires the lowest SHGC to minimize unwanted solar heat gain.
You can find detailed zone maps and recommendations on the ENERGY STAR® website.
Setting A Realistic Budget
Window replacement is a significant financial undertaking. Establishing a clear and realistic budget before you start getting quotes is essential to avoid financial strain and ensure you can afford the quality of windows and installation you desire.
Understanding Cost Components
The total cost of replacing your windows typically includes several components:
- Window Units: The price of the windows themselves varies greatly depending on material, style, size, brand, and energy-efficient features (like triple-pane glass or specialized coatings).
- Labor: Professional installation is crucial for proper performance and longevity. Labor costs can vary based on the complexity of the job, the number of windows, and the prevailing rates in your area.
- Removal and Disposal: The cost of removing and disposing of your old windows.
- Potential Repairs: If your inspection reveals issues with the window frames, sills, or surrounding wall structure (like rot or water damage), these repairs will add to the overall cost.
- Hardware and Trim: Costs associated with new hardware, interior trim, and exterior caulking and finishing.
- Permits: Some municipalities require permits for window replacement, which adds a small fee.
Estimating Costs
- DIY vs. Professional Installation: While DIY can save on labor, it’s generally not recommended for full window replacement unless you have significant construction experience. Improper installation can void warranties and lead to performance issues.
- Average Costs: National averages can range from $400 to $1,200 per window for basic vinyl replacement windows, including installation. High-end materials like wood or custom-sized windows can push the cost to $1,500-$3,000 or even more per window. A project involving 10 windows could therefore range from $4,000 to $30,000 or higher.
- Pro Tip: Always ask contractors if their quote includes all aspects: window removal, installation, debris disposal, and any necessary flashing or sealing.
Building In A Contingency
It’s wise to add a contingency fund of 10-20% to your budget. This buffer will cover unexpected issues that might arise during demolition, such as discovering rot or structural damage that needs immediate repair.
Choosing The Right Professionals
The quality of your window installation is just as important as the quality of the windows themselves. Selecting a reputable, experienced contractor is paramount to a successful project.
Vetting Contractors
Don’t choose the first contractor you speak with. Take the time to research and vet potential candidates thoroughly.
- Seek Recommendations: Ask friends, family, neighbors, or colleagues for recommendations. Local hardware stores or building supply companies can also be good sources.
- Check Online Reviews: Look for reviews on platforms like Google, Yelp, Angie’s List, and the Better Business Bureau (BBB). Pay attention to both positive and negative feedback.
- Verify Credentials:
- Licensing: Ensure the contractor holds the necessary licenses required by your state or local municipality.
- Insurance: Confirm they have adequate liability insurance and workers’ compensation insurance. Ask for proof. This protects you from financial responsibility if an accident occurs on your property.
- Experience: How long have they been in business? Do they specialize in window replacement? How many projects similar to yours have they completed?
- Look for Certifications: Some manufacturers offer certifications for installers who have been trained on their specific products.
Getting Multiple Quotes
Obtain detailed, written quotes from at least three different contractors. Ensure each quote includes:
- A detailed breakdown of the scope of work.
- The specific window models, brands, and specifications being quoted.
- The total cost, including materials, labor, removal, disposal, and any potential additional charges.
- A clear timeline for the project.
- Warranty information for both the product and the labor.
Pro Tip: Be wary of quotes that are significantly lower than others. This could indicate cut corners, less experienced labor, or lower-quality materials.
Understanding Contracts
Read the contract carefully before signing. Ensure it matches the verbal agreements and the quote you received. Key elements to verify include:
- All details from the quote (materials, labor, etc. ).
- Payment schedule (avoid paying the full amount upfront). A common schedule is a deposit, a progress payment, and final payment upon satisfactory completion.
- Start and estimated completion dates.
- Warranty details (product and labor).
- A clause addressing change orders for any work not initially included.
The National Roofing Contractors Association offers excellent general advice on hiring contractors that applies broadly to home improvement professionals.
Considering Climate And Local Factors
Your local climate and specific property conditions play a significant role in determining the best window choices and installation considerations.
Climate-specific Needs
- Cold Climates: Prioritize windows with very low U-factors to minimize heat loss. Double- or triple-pane windows with argon or krypton gas fills and Low-E coatings are essential. Consider warm-edge spacer systems between glass panes.
- Hot Climates: Focus on windows with a low SHGC to reduce solar heat gain, which directly impacts cooling costs. Low-E coatings designed to reflect solar radiation are crucial. Window tinting or coatings can also be beneficial.
- Humid Climates: Wood windows require extra diligence regarding maintenance and proper sealing to prevent rot and moisture damage. Ensure good ventilation to prevent condensation buildup within the home.
- Coastal Areas: Salt spray can corrode metal components. Aluminum windows should have appropriate protective coatings, or consider vinyl or fiberglass which are naturally resistant to corrosion.
Local Building Codes And Hoa Regulations
- Building Codes: Some areas have specific building codes related to window energy efficiency, safety (e.g., egress requirements for bedrooms), and installation methods. Ensure your chosen windows and installation practices comply with these regulations. Your contractor should be knowledgeable about local codes.
- Homeowners Associations (HOAs): If you live in a community with an HOA, review their guidelines regarding exterior modifications. There may be restrictions on window styles, frame colors, or materials to maintain neighborhood aesthetics. Get approval from your HOA before proceeding.
Preparing For Installation Day
Once you’ve selected your windows and contractor, you need to prepare your home for the installation process. This will help the project run smoothly and minimize disruption to your household.
Protecting Your Home And Belongings
- Clear the Area: Remove all furniture, decorations, curtains, and blinds from the windows being replaced. Move larger items away from the walls surrounding the windows to give installers ample working space.
- Protect Floors and Furniture: Lay down drop cloths or plastic sheeting on floors in the work areas and along the path the installers will use to enter and exit your home. Cover any nearby furniture that cannot be moved.
- Secure Valuables: Remove or secure any delicate or valuable items that could be damaged by dust or vibration.
Preparing Your Family And Pets
- Communicate the Schedule: Ensure all household members are aware of the installation dates and expected duration.
- Plan for Noise and Dust: Window replacement can be noisy and dusty. Plan for activities to be elsewhere if needed, especially if you have very young children or pets sensitive to noise.
- Pet Safety: Keep pets confined to a safe, quiet area of the house, away from the work zones, to prevent them from escaping or getting injured.
Pre-installation Walk-through
Before the installers begin, conduct a brief walk-through with the lead installer. Confirm the scope of work, the order in which windows will be replaced (if applicable), and any specific concerns you might have.