
The persistent sound of a toilet constantly refilling can be more than just an annoyance; it’s a clear sign of a plumbing issue that demands attention. This continuous running is not only disruptive to your peace but also a significant drain on your water supply, leading to surprisingly high water bills. Understanding the common culprits behind a running toilet is the first step toward diagnosing and fixing the problem, saving you water, money, and the frustration of a perpetually flushing commode.
From a faulty flapper to an improperly adjusted float, several components within the toilet tank can cause this ceaseless water flow. Each part plays a crucial role in the flushing mechanism, and when one fails, the entire system can be thrown off balance.
This guide will walk you through the anatomy of a toilet tank, the common reasons for a running toilet, and step-by-step instructions on how to address these issues yourself, empowering you to tackle this common household problem with confidence.
Key Takeaways
- A toilet keeps running due to issues with internal tank components, most commonly the flapper, fill valve, or float.
- Water wastage from a running toilet can significantly increase utility bills and environmental impact.
- The flapper valve is the most frequent cause, failing to create a proper seal and allowing water to continuously leak into the bowl.
- The fill valve or ballcock controls water refilling the tank, and if it malfunctions, it can lead to constant filling.
- An improperly adjusted float can cause the fill valve to remain open, leading to an overflowing tank and continuous running.
- Simple DIY repairs, such as flapper replacement or float adjustment, can often resolve the issue.
- Regular toilet maintenance can prevent many running toilet problems.
Credit: www.youtube.com
Understanding Your Toilet’s Anatomy
Before diving into troubleshooting, it’s essential to understand the basic components within your toilet tank and how they work together. This knowledge is crucial for accurately identifying the source of the problem. The primary parts involved in the flushing and refilling process are located inside the tank.
The Flush Mechanism
When you press the flush lever, it lifts a chain or rod connected to the flapper. The flapper is a rubber or plastic seal at the bottom of the tank that covers the flush valve seat. Lifting the flapper allows water to rush from the tank into the toilet bowl, initiating the flush. Once the water level drops, the flapper falls back into place, sealing the flush valve seat and preventing further water from entering the bowl.
The Refill Mechanism
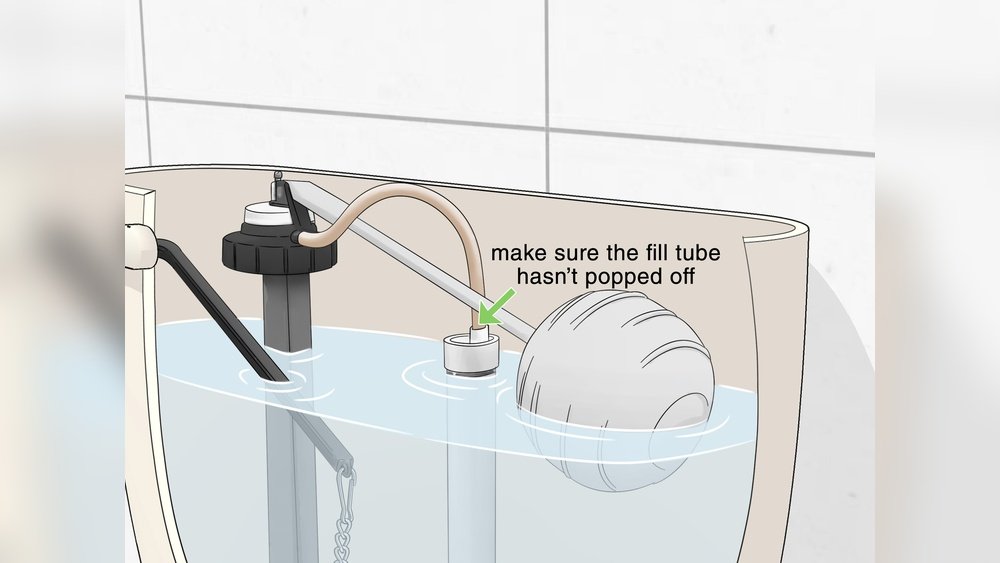
After the flush, the fill valve (also known as the ballcock) takes over. This valve is responsible for refilling the tank with fresh water from the supply line. It’s typically connected to a float, which is a buoyant device (often a ball or a cup) that rises with the water level. As the water level rises, the float signals the fill valve to shut off. The fill valve also has an overflow tube, a vertical pipe that prevents the tank from overfilling by directing excess water into the bowl.
Common Points Of Failure
Problems arise when these components don’t function as intended. A worn-out flapper might not seal properly, a faulty fill valve could fail to shut off, or an incorrectly set float could keep the fill valve perpetually open. Even a simple clog in the flush valve seat can prevent the flapper from sealing effectively.

Credit: metaltecnica.com
Why Your Toilet Keeps Running: Top Culprits
A continuously running toilet is almost always a sign that something is amiss with one of the internal components. Identifying the specific issue is key to a swift and effective repair. The most common culprits are surprisingly straightforward and often involve wear and tear on these essential parts.
The Worn-out Flapper
The flapper is the most frequent offender when it comes to a running toilet. This rubber or plastic seal sits at the bottom of the tank and is lifted by the flush handle. Its job is to create a watertight seal over the flush valve opening. Over time, the rubber can degrade, warp, or become brittle due to constant contact with water and cleaning chemicals.
- Signs of a failing flapper:
- Visible wear: Cracks, tears, or a distorted shape.
- Hardening: The rubber feels stiff and less flexible.
- Discoloration: Often a sign of chemical damage.
- The “dye test”: Add a few drops of food coloring to the tank water (without flushing). Wait 15-20 minutes. If color appears in the toilet bowl, the flapper is not sealing properly.
A leaky flapper allows a slow but steady stream of water to escape the tank and enter the bowl, prompting the fill valve to constantly replenish the lost water, thus creating the continuous running sound.
The Faulty Fill Valve (ballcock)
The fill valve, often referred to as the ballcock, is the mechanism that refills the tank after each flush and maintains the correct water level. If this valve malfunctions, it can lead to a running toilet in a couple of ways: it might fail to shut off completely, or it might cause the water level to be too high.
- Failure to shut off: The internal seals or diaphragm within the fill valve can wear out, preventing it from completely stopping the flow of water even when the float indicates the tank is full.
- High water level: If the fill valve doesn’t shut off at the correct level, the water will continue to fill the tank until it reaches the top of the overflow tube. This excess water then spills down the overflow tube into the bowl, triggering the fill valve to try and refill the tank again.
Modern toilets often use anti-siphon fill valves, which have a built-in overflow tube. Older models might have a separate overflow pipe. Regardless of the type, a malfunctioning fill valve is a significant cause of a constantly running toilet.
The Misadjusted Float
The float is intrinsically linked to the fill valve. Its purpose is to rise with the water level and signal the fill valve to shut off when the water reaches the desired height. If the float is set too high, it will keep the fill valve open longer than necessary, leading to an overflowing tank.
- Float ball: If you have a float ball, it might be waterlogged and no longer buoyant, or its arm might be bent too low.
- Cup float: Many modern toilets use a cup-style float that slides up and down the fill valve shank. These have an adjustment screw or clip that can be manipulated to change the shut-off height.
An incorrectly set float can mimic the symptoms of a faulty fill valve, causing continuous refilling.
Clogged Flush Valve Seat
While less common than flapper or fill valve issues, a clogged flush valve seat can also contribute to a running toilet. The flush valve seat is the rim at the bottom of the tank where the flapper rests. Mineral deposits, sediment, or debris can accumulate on this surface, preventing the flapper from forming a perfect seal.
- Symptoms: Even with a seemingly good flapper, water might still leak into the bowl, triggering the refill cycle.
- Diagnosis: You might notice rough patches or buildup on the rim where the flapper sits.
Cleaning this area is crucial for ensuring the flapper can do its job effectively.

Credit: orangecoastplumbing.net
Diagnosing The Running Toilet: A Step-by-step Approach
Before you start replacing parts, it’s essential to pinpoint the exact cause of the running toilet. This diagnostic process will save you time and money by ensuring you address the correct component.
Step 1: Listen And Observe
The first step is to simply listen to your toilet. Is it a constant hiss, a gurgling sound, or intermittent bursts of running water?
- Constant hiss: Often indicates a faulty fill valve that isn’t shutting off.
- Intermittent running: Could be a flapper that’s not sealing well, allowing water to leak slowly, or a float set too low.
Observe the water level in the tank. Is it too high, reaching above the overflow tube? Or is it consistently dropping?
Step 2: The Dye Test (check The Flapper)
As mentioned earlier, the dye test is a simple yet effective way to check the flapper’s seal.
- Remove the tank lid and set it aside carefully.
- Add a few drops of food coloring or a toilet dye tablet into the tank water. Do not flush.
- Wait for 15-20 minutes.
- Check the water in the toilet bowl. If colored water has seeped into the bowl, your flapper is not creating a watertight seal.
Step 3: Inspect The Flapper
If the dye test indicates a leaky flapper:
- Examine the flapper: Look for any visible signs of wear, cracks, tears, or hardening.
- Check the chain: Ensure the flush chain isn’t too long, causing it to get caught under the flapper, or too short, preventing the flapper from fully seating. There should be a little slack.
- Feel the flush valve seat: Run your finger around the rim where the flapper sits. Is it smooth, or can you feel any nicks, mineral buildup, or debris?
Step 4: Assess The Fill Valve And Float
If the dye test shows the flapper is sealing correctly, the problem likely lies with the fill valve or float.
- Observe the water level: After the tank has refilled, check if the water level is above the top of the overflow tube. If it is, the fill valve isn’t shutting off correctly, or the float is set too high.
- Check the float mechanism:
- Float ball: Is it submerged or heavy? Is the float arm bent downwards, keeping the valve open?
- Cup float: Is the cup moving freely up and down the shank? Is it catching on anything? Is the adjustment screw or clip set correctly?
- Listen to the fill valve: Does it continue to hiss or trickle water even after the tank is full?
Step 5: Examine The Overflow Tube
The overflow tube is a safety feature. If the water level consistently rises above its rim, water will pour down it into the bowl.
- Check for cracks: Inspect the tube itself for any damage.
- Ensure proper height: The fill valve should shut off the water *before* it reaches the top of the overflow tube.
By systematically going through these steps, you can usually isolate the component causing your toilet to run continuously.
Diy Repairs: Fixing The Running Toilet
Once you’ve identified the faulty component, most running toilet issues can be resolved with basic tools and a few replacement parts. These DIY fixes are generally straightforward and can save you the cost of a plumber.
Replacing A Worn-out Flapper
This is perhaps the most common and easiest DIY toilet repair.
Tools Needed: Pliers (optional, for removing stubborn clips), new flapper.
Steps:
- Turn off the water supply: Locate the shut-off valve on the wall behind the toilet and turn it clockwise until it stops.
- Flush the toilet: Hold the handle down to drain as much water as possible from the tank.
- Remove the old flapper: Most flappers attach to the overflow tube with two pegs or clips. Gently unhook or unclip the old flapper. Then, detach the flush chain from the flush lever arm.
- Attach the new flapper: Connect the new flapper to the overflow tube pegs. Ensure it sits flat.
- Connect the chain: Attach the flush chain to the flush lever arm. Adjust the chain length so there is only a slight slack (about 1/2 inch) when the flapper is closed. Too much slack means the chain might get caught, too little means it might hold the flapper open.
- Turn the water supply back on: Slowly turn the shut-off valve counter-clockwise.
- Test the flush: Flush the toilet and listen. The running sound should stop. Perform the dye test again to confirm a good seal.
Adjusting Or Replacing The Fill Valve And Float
This repair is slightly more involved but still manageable for most DIYers.
Tools Needed: Adjustable wrench, screwdriver (for some float types), new fill valve assembly (if replacing).
Steps for Adjusting a Cup-Style Float:
- Turn off the water supply and flush the toilet to drain the tank.
- Locate the adjustment screw on the fill valve or the clip mechanism.
- Lower the float: If the water level is too high, turn the screw counter-clockwise or adjust the clip to lower the float’s position. This will cause the fill valve to shut off at a lower water level.
- Turn the water back on and test. Repeat adjustments as needed.
Steps for Replacing a Fill Valve Assembly:
- Turn off the water supply and flush to drain the tank.
- Disconnect the water supply line: Use an adjustable wrench to unscrew the nut connecting the supply line to the fill valve shank at the bottom of the tank. Have a towel ready for drips.
- Remove the old fill valve: Inside the tank, there’s usually a large locknut holding the fill valve to the tank. Unscrew this nut (you might need to hold the valve steady from the inside). Lift the old fill valve out.
- Install the new fill valve: Follow the manufacturer’s instructions. Generally, you’ll insert the new valve from the inside, ensuring the overflow tube is properly positioned, and then tighten the locknut from underneath the tank. Reconnect the water supply line.
- Turn the water on and test. Adjust the float to the desired water level (typically about 1 inch below the top of the overflow tube).
Cleaning The Flush Valve Seat
If you suspect debris on the flush valve seat:
Tools Needed: Sponge or cloth, mild abrasive cleaner (like vinegar or baking soda paste), gloves.
Steps:
- Turn off the water supply and flush to drain the tank.
- Clean the seat: Carefully wipe the flush valve seat with a damp sponge or cloth. For stubborn buildup, use a mild abrasive cleaner. Be gentle to avoid scratching the surface.
- Rinse: You can pour a little water into the tank to rinse away debris.
- Turn the water back on and test.
Replacing The Entire Flush Valve Assembly
In some cases, the entire flush valve assembly (which includes the overflow tube and the opening for the flapper) might be damaged or corroded. This is a more involved repair but follows similar steps to replacing the fill valve, focusing on the large nut at the bottom of the tank that secures the entire assembly.
When To Call A Professional Plumber
While many running toilet issues are simple DIY fixes, there are times when it’s best to call in a professional plumber. Recognizing these situations can save you from further damage or unnecessary frustration.
Complex Plumbing Systems
If your home has an older or particularly complex plumbing system, you might encounter issues beyond the scope of a typical DIY repair. Issues with the water pressure or the main supply line could be contributing factors that require expert diagnosis.
Persistent Problems
If you’ve tried all the common DIY fixes, replacing the flapper, adjusting the float, cleaning the seat, and the toilet still runs, it might indicate a deeper problem. This could involve hidden cracks in the tank, issues with the valve seat itself that aren’t visible, or problems with the toilet’s connection to the drain line.
Lack Of Time Or Confidence
Plumbing repairs, even simple ones, can be intimidating for some. If you lack the necessary tools, time, or confidence to tackle the repair yourself, calling a plumber is a sensible option. Attempting a repair without the right knowledge can sometimes lead to more significant damage, costing more in the long run.
Signs Of More Serious Issues
Occasionally, a running toilet can be a symptom of a larger problem, such as a leaking toilet base (indicating a bad wax ring) or issues with the drainage system. If you notice water pooling around the base of the toilet, or if multiple fixtures in your home are experiencing drainage problems, it’s a clear sign to call a professional.
A qualified plumber has the experience and specialized tools to quickly diagnose and fix even the most stubborn running toilet issues, ensuring your plumbing system operates efficiently and without waste. You can find reputable plumbers through local recommendations or online directories, looking for those with good reviews and proper licensing.
Preventing Future Running Toilet Issues
Once you’ve successfully fixed your running toilet, taking proactive steps can help prevent the problem from recurring. Regular maintenance and awareness are key to keeping your toilet running smoothly and efficiently.
Regular Inspections
Make it a habit to occasionally remove the toilet tank lid and perform a quick visual inspection.
- Check the flapper: Look for signs of wear or degradation.
- Observe the water level: Ensure it’s consistently at the correct height.
- Listen for unusual sounds: Pay attention to any hissing or trickling noises when the toilet isn’t in use.
The Dye Test Routine
Incorporate the dye test into your routine, perhaps every six months. This simple test can catch a leaky flapper long before it becomes a noticeable problem, saving water and preventing the annoying sound of a constantly running toilet.
Use Toilet-friendly Cleaners
Many toilet bowl cleaners contain harsh chemicals that can accelerate the degradation of rubber components like the flapper. Opt for milder cleaners or natural alternatives like vinegar and baking soda. Avoid cleaners that require you to leave chemicals sitting in the tank for extended periods.
Be Gentle With The Flush Handle
While not a direct cause of running toilets, excessive force on the flush handle can sometimes damage the internal linkage or the flush valve mechanism over time. Use a firm but gentle push.
Address Small Leaks Promptly
If you notice any minor leaks or drips from the tank or bowl, don’t ignore them. Small issues can often escalate into bigger problems if left unaddressed.
Consider Upgrading Older Parts
If your toilet is quite old, its internal components may be nearing the end of their lifespan. Consider replacing the flapper and even the fill valve as a preventative measure, especially if you notice signs of wear. Modern replacement parts are often more efficient and durable than older models.
A little bit of preventative maintenance goes a long way in ensuring your toilet operates correctly and avoids the common, costly problem of a continuous flush.
Water Conservation And Cost Savings
The impact of a running toilet extends beyond mere annoyance; it has significant implications for water conservation and your household budget. Understanding these impacts can underscore the importance of timely repairs.
Water Waste Statistics
A toilet that runs continuously can waste a staggering amount of water.
- A slow leak from a bad flapper can waste 20 to 50 gallons per day.
- A constantly running toilet can waste up to 200 gallons per day.
To put this into perspective, the average American uses about 80-100 gallons of water per day for all household needs. A single running toilet can therefore account for more than half of an individual’s daily water consumption, simply by leaking away.
Financial Implications
This water waste translates directly into higher utility bills. Water rates vary significantly by region, but even at a modest rate of $3-$5 per 1,000 gallons, a constantly running toilet can add $30 to $100 or more to your monthly water bill. Over a year, this can amount to hundreds of dollars lost to unnecessary water usage.
Environmental Impact
Beyond the financial cost, the unnecessary consumption of water has a considerable environmental impact. Treating and pumping water requires significant energy resources. Wasting water means wasting the energy used in its purification and distribution, contributing to a larger carbon footprint. Furthermore, in regions facing water scarcity, every drop saved is crucial for maintaining local ecosystems and ensuring adequate supply for essential needs.
The Roi Of A Quick Fix
The cost of replacement parts for a toilet repair (like a flapper or fill valve) is typically minimal, often ranging from $5 to $30. The tools required are standard household items. The time investment for a DIY repair is usually less than an hour. Therefore, the return on investment for fixing a running toilet is exceptionally high, with savings on water bills beginning immediately after the repair.
Table: Cost Of Water Waste From A Running Toilet
| Leak Rate (Gallons per Day) | Daily Cost (at $4/1000 gal) | Monthly Cost (approx.) | Annual Cost (approx.) |
|---|---|---|---|
| 50 | $0.20 | $6.00 | $72.00 |
| 100 | $0.40 | $12.00 | $144.00 |
| 200 | $0.80 | $24.00 | $288.00 |
*Note: Costs are approximate and will vary based on local water rates.*
Addressing a running toilet isn’t just about silencing an annoying sound; it’s a responsible step towards water conservation and significant cost savings.
Frequently Asked Questions
How Often Should I Perform Maintenance On My Toilet?
It’s advisable to perform a basic inspection and the dye test every six months. This proactive approach can help catch issues like a deteriorating flapper early on. Beyond that