
Experiencing issues with your OBS mic not working can be incredibly frustrating, especially when you’re trying to stream, record content, or participate in a crucial video call. The silence from your microphone in OBS Studio, a popular and powerful open-source broadcasting software, can stem from a variety of sources, ranging from simple configuration errors to more complex hardware or software conflicts. This comprehensive guide will walk you through the most common reasons your microphone isn’t being picked up by OBS and provide step-by-step solutions to get your audio back online.
Understanding the intricacies of audio input within OBS can feel daunting, but by systematically troubleshooting each potential problem area, you can pinpoint the cause and implement the fix. We’ll cover everything from checking basic Windows or macOS audio settings to diving deep into OBS’s own audio mixer, filters, and even potential conflicts with other applications.
Whether you’re a seasoned streamer or new to content creation, this guide aims to equip you with the knowledge and practical steps needed to resolve your OBS mic issues efficiently.
Key Takeaways
- Check Basic Connections and Device Selection: Ensure your microphone is properly plugged in and selected as the default recording device in your operating system and within OBS.
- Verify OBS Audio Mixer: Confirm your microphone source is added, unmuted, and has sufficient volume levels in OBS’s Audio Mixer.
- Review Windows/macOS Privacy Settings: Ensure OBS has permission to access your microphone.
- Disable Exclusive Mode: Prevent other applications from taking exclusive control of your microphone.
- Update Drivers and OBS: Outdated drivers or software can cause compatibility issues.
- Test with Other Applications: Rule out hardware failure by testing your microphone in different programs.
- Utilize OBS Filters: Sometimes, filters can inadvertently mute or reduce audio levels.

Credit: www.youtube.com
Troubleshooting Your Obs Mic: A Step-by-step Approach
When your microphone refuses to cooperate with OBS Studio, it’s crucial to approach the problem systematically. Jumping to conclusions can waste valuable time. This section outlines a logical flow of troubleshooting steps, starting with the simplest checks and progressing to more advanced solutions.
1. Fundamental Checks: The Obvious First Steps
Before diving into complex settings, let’s ensure the basics are covered. These are often overlooked but are the most frequent culprits for a mic not working in OBS.
Microphone Connection And Power
- Physical Connection: For USB microphones, ensure the cable is securely plugged into both the microphone and a functional USB port on your computer. Try a different USB port if possible. For XLR microphones connected via an audio interface, verify all connections are snug, including phantom power if your microphone requires it.
- Power: Some microphones, especially condenser mics, require phantom power (+48V) which is usually enabled on your audio interface. Check your interface’s manual to ensure this is correctly set. Many USB mics also have a power switch or indicator light; confirm it’s on.
- Microphone Mute Button: Many microphones have a physical mute button on the device itself. Double-check that this hasn’t been accidentally pressed.
Operating System Audio Settings
Your computer needs to recognize and be configured to use your microphone correctly.
- Windows:
- Right-click the speaker icon in your system tray (bottom right corner).
- Select “Open Sound settings” or “Sounds”.
- Under the “Input” section, ensure your desired microphone is selected from the dropdown menu.
- Click “Device properties” (or similar) to check the microphone’s volume level and ensure it’s not muted. Speak into the mic and observe the “Test your microphone” bar; it should show activity.
- Go to “Sound Control Panel” (usually accessible from the Sound settings page) and navigate to the “Recording” tab.
- Right-click your microphone and select “Set as Default Device” and “Set as Default Communication Device”.
- Right-click your microphone again and select “Properties”. Go to the “Listen” tab and check “Listen to this device” temporarily to hear yourself. This helps confirm the mic is picking up sound at the OS level. Remember to uncheck this later to avoid audio feedback loops.
- MacOS:
- Go to System Preferences > Sound.
- Click the “Input” tab.
- Select your microphone from the list.
- Ensure the “Input volume” slider is turned up and the microphone is not muted.
- Speak into the microphone and observe the “Input level” meter; it should show activity.
Obs Studio Audio Settings
Even if your OS recognizes the mic, OBS needs to be told to use it.
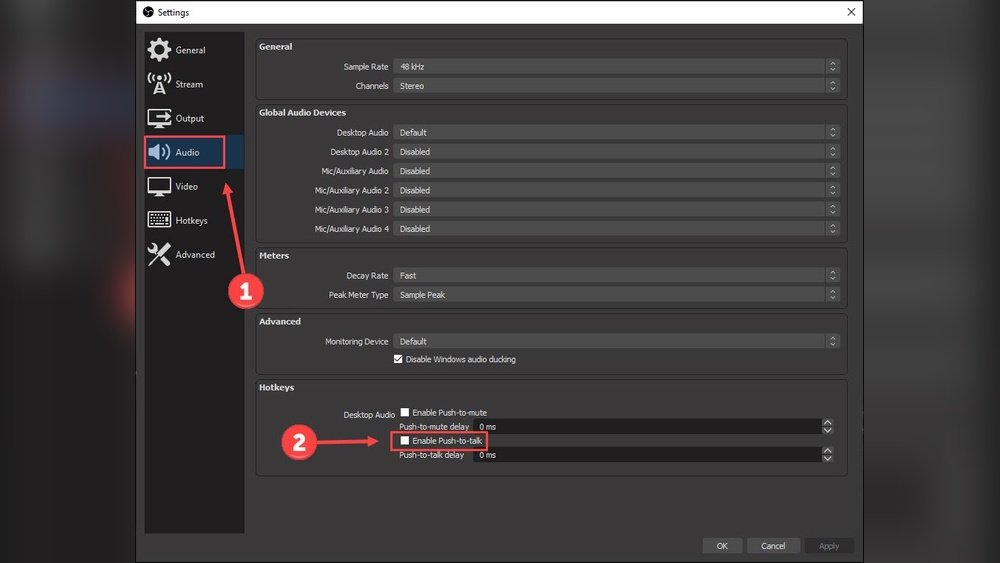
- Open OBS Studio.
- Go to File > Settings (or OBS > Preferences on macOS).
- Navigate to the “Audio” tab.
- Under “Global Audio Devices”:
- For “Mic/Auxiliary Audio”: Select your microphone from the dropdown list. If you have multiple audio devices, ensure you choose the correct one.
- If you don’t see your mic here, it might be better to add it as a Source (see next section).
- Click “Apply” and then “OK”.
2. Obs Audio Mixer: The Heart Of Your Sound
The Audio Mixer panel in OBS is where you manage all your audio sources. A common reason for a mic not showing in OBS or not producing sound is a misconfiguration here.
Adding Your Microphone As A Source
If your microphone isn’t automatically appearing or you prefer manual control:
- In the main OBS window, locate the “Sources” dock.
- Click the “+” button at the bottom of the Sources dock.
- Select “Audio Input Capture”.
- Choose “Create new” and give your microphone source a descriptive name (e.g., “My USB Mic,” “Podcast Mic”). Click “OK”.
- In the Properties window that appears, select your microphone from the “Device” dropdown menu.
- Click “OK”.
Checking The Audio Mixer Panel
Once your microphone is added as a source (either automatically detected or manually added), it should appear as a fader in the “Audio Mixer” dock.
- Visibility: Ensure your microphone source is listed. If not, revisit the steps for adding it as a source.
- Mute Button: Look for the speaker icon next to your microphone’s fader. If it’s red and has a line through it, the source is muted. Click it to unmute.
- Volume Level: Speak into your microphone. You should see the level meter next to your microphone’s fader moving. If it’s not moving, there’s still a connection or detection issue.
- Fader Position: Ensure the volume fader for your microphone is not set all the way to the left (silenced). Adjust it to a reasonable level, typically between -20dB and -6dB for most content. Aim for the yellow range on the meter, occasionally touching the orange, but avoiding consistent red (clipping/distortion).
- Desktop Audio vs. Mic/Aux: Make sure you are adjusting the fader for your microphone source and not “Desktop Audio,” which captures sound from your computer’s speakers or applications.
Monitoring Your Audio
OBS offers audio monitoring options to help you hear your microphone input.
- In the “Audio Mixer” dock, click the gear icon next to your microphone source.
- Select “Advanced Audio Properties”.
- In the “Monitoring” column for your microphone source, you have a few options:
- “Monitor Off”: You won’t hear your mic through OBS.
- “Monitor Only (mute output)”: You’ll hear your mic through OBS (via your headphones/speakers) but it won’t be included in the final recording or stream output. This is useful for checking if the mic is working.
- “Monitor and Output”: You’ll hear your mic through OBS, *and* it will be included in the stream/recording. Warning: This can cause echo or feedback if your speakers are picked up by the microphone. Use headphones when this is enabled.
- If you choose a monitoring option, ensure your “Audio Monitoring Device” is correctly set in Settings > Audio.
3. Privacy And Permissions: The Gatekeepers
Modern operating systems have strict privacy controls to prevent applications from accessing sensitive hardware like microphones without user consent. A common reason for a mic not detected in OBS is a lack of permission.
Windows Privacy Settings
- Go to Settings > Privacy (or Settings > Privacy & security in Windows 11).
- Scroll down and click on “Microphone” under “App permissions.”
- Ensure “Microphone access for this device” is turned On. If not, click “Change” and toggle it on.
- Scroll down further to “Let apps access your microphone” and ensure this is toggled On.
- Crucially, scroll down to the list of applications and find “OBS Studio”. Make sure the toggle switch next to it is On.
- If OBS is listed under “Desktop apps,” ensure it has permission there as well.
Macos Privacy Settings
- Go to System Preferences > Security & Privacy.
- Click the “Privacy” tab.
- Select “Microphone” from the left-hand sidebar.
- You’ll likely need to click the lock icon in the bottom left corner and enter your password to make changes.
- Find “OBS” in the list of applications. Ensure the checkbox next to it is ticked. If it’s not listed, you may need to uninstall and reinstall OBS while ensuring you grant permissions during the initial setup, or check if it falls under a broader category.
- Close System Preferences. You might need to restart OBS for the changes to take effect.
4. Exclusive Mode And Application Conflicts
Sometimes, another application might be using your microphone in a way that prevents OBS from accessing it. This often relates to “Exclusive Mode” settings in Windows.
Disabling Exclusive Mode (windows)
Exclusive Mode allows an application to take direct control of an audio device, potentially locking it out for other programs.
- Right-click the speaker icon in your system tray.
- Select “Sounds”.
- Go to the “Recording” tab.
- Right-click your microphone and select “Properties”.
- Navigate to the “Advanced” tab.
- Under “Exclusive Mode,” uncheck the boxes for “Allow applications to take exclusive control of this device” and “Give exclusive mode applications priority. “
- Click “Apply” and then “OK.”
- Restart OBS Studio.
Identifying Conflicting Applications
- Video Conferencing Software: Applications like Zoom, Discord, Microsoft Teams, or Skype can sometimes interfere. Ensure they are closed completely (not just minimized) when you’re trying to use OBS. Check their audio settings to see if they are set to use your primary microphone.
- Voice Changers or Audio Routing Software: Any software that manipulates or routes audio might cause conflicts. Try disabling them temporarily.
- Other Recording Software: Ensure no other recording or streaming software is running simultaneously and attempting to access the same microphone.
5. Drivers And Software Updates
Outdated or corrupted drivers are a frequent cause of hardware malfunction, including microphone issues. Similarly, using an outdated version of OBS can lead to compatibility problems.
Updating Audio Drivers (windows)
- Right-click the Start button and select “Device Manager. “
- Expand the “Audio inputs and outputs” section.
- Right-click your microphone (or your sound card/audio interface if it’s not listed directly) and select “Update driver.”
- Choose “Search automatically for drivers.”
- If Windows finds a newer driver, follow the prompts to install it.
- Alternatively, visit the website of your computer manufacturer (Dell, HP, Lenovo, etc.) Or your motherboard manufacturer (ASUS, Gigabyte, MSI, etc.) For the latest audio drivers specific to your model. For external audio interfaces, visit the manufacturer’s website (e.g., Focusrite, PreSonus, Behringer).
- Restart your computer after updating drivers.
Updating Obs Studio
- Open OBS Studio.
- Go to Help > Check For Updates.
- If an update is available, follow the prompts to download and install it.
- It’s generally recommended to keep OBS updated to the latest stable version to benefit from bug fixes and new features.
Updating Macos Audio Drivers
MacOS generally handles driver updates through its system updates.
- Go to System Preferences > Software Update.
- Install any available macOS updates.
- For specific audio interfaces, check the manufacturer’s website for macOS-specific driver updates.
6. Testing Your Microphone Outside Obs
To definitively rule out OBS as the sole source of the problem, test your microphone in other applications.
- Windows: Use the “Test your microphone” feature in Sound Settings (as described in Section 1) or open the Voice Recorder app.
- MacOS: Use the “Input level” meter in System Preferences > Sound > Input, or open QuickTime Player, go to File > New Audio Recording, select your mic, and try recording.
- Cross-Platform: Use a web-based microphone test tool like Online Mic Test.
If your microphone works in these other applications, the issue is almost certainly within OBS’s configuration. If it *doesn’t* work elsewhere, the problem lies with the microphone hardware, its connection, or your operating system’s audio settings.
7. Obs Filters And Advanced Settings
While less common, specific OBS filters or advanced settings can sometimes cause audio issues.
Checking Obs Filters
- In the “Sources” dock, right-click your microphone source.
- Select “Filters.”
- Review any applied filters (e.g., Noise Suppression, Gain, Compressor).
- Try disabling each filter one by one by unchecking the box next to it to see if it resolves the issue. A misconfigured gain filter, for example, could be drastically lowering your microphone’s volume.
- Ensure the “Mic/Aux” source itself isn’t muted or set to an extremely low volume within the Audio Mixer.
Advanced Audio Properties
- In the “Audio Mixer” dock, click the gear icon next to your microphone source.
- Select “Advanced Audio Properties.”
- Sync Offset: Ensure this is set to 0 unless you are experiencing audio sync issues. A large offset could theoretically cause problems, though it’s rare.
- Monitoring: As mentioned earlier, ensure monitoring settings are appropriate.
- Tracks: Verify that your microphone is assigned to the correct audio track(s) for recording or streaming. Usually, Track 1 is the default for streaming.
8. Hardware Issues And Advanced Scenarios
If all software troubleshooting fails, it’s time to consider hardware or more complex system interactions.
Testing With A Different Cable/port
- A faulty USB cable or a problematic audio interface connection can cause intermittent or complete failure. Try a different, known-good cable.
Testing With A Different Computer
- If possible, connect your microphone to a completely different computer. This is the ultimate test to determine if the microphone itself is faulty.
Usb Power Issues
- Some microphones, especially higher-end USB models, require more power than certain USB ports or hubs can provide. Try connecting directly to a USB port on your computer’s motherboard (usually the rear ports on a desktop) rather than a front panel port or an unpowered hub.
Sample Rate Mismatch
- Ensure your microphone’s sample rate (in Windows/macOS sound properties) matches the sample rate set in OBS (Settings > Audio > Sample Rate). Mismatched rates (e.g., 44.1 kHz vs. 48 kHz) can sometimes cause audio dropouts or no sound. 48 kHz is generally recommended for streaming and video.
Let’s compare common microphone types and their potential connection nuances:
| Microphone Type | Connection Method | Common Issues | Troubleshooting Focus |
|---|---|---|---|
| USB Microphone | Direct USB connection to PC | Driver conflicts, insufficient USB power, OS permissions, software conflicts (Discord, Zoom) | Update drivers, check USB port/cable, verify OS privacy settings, disable exclusive mode, test in other apps |
| XLR Microphone (via Audio Interface) | XLR cable to Audio Interface, Interface via USB/Thunderbolt to PC | Phantom power setting, audio interface drivers, interface connection issues, gain staging | Check phantom power, update interface drivers, verify interface is recognized by OS, check gain levels on interface |
| 3.5mm Jack Microphone (e.g., Headset Mic) | Direct 3.5mm connection to PC sound card | Incorrect port selection (mic vs. line-in), onboard audio drivers, OS settings | Ensure plugged into the correct mic jack (often pink), update onboard audio drivers, check OS input settings |
Example Scenario: The Discord Dilemma
Sarah, a Twitch streamer, noticed her mic wasn’t working in OBS. She had recently updated Discord and was talking to friends. After checking OBS settings, drivers, and permissions, her mic still showed no activity.
The Fix: Sarah realized Discord, after its update, had automatically set itself to use her USB microphone exclusively. Even though Discord was closed, a background process or a lingering setting was preventing OBS from accessing the mic. She went into Discord’s User Settings > Voice & Video and explicitly set her microphone to “Default” or deselected it. She then restarted OBS, and her microphone audio returned. This highlights how other applications, even when seemingly closed, can impact audio device availability.

Credit: www.youtube.com
Frequently Asked Questions
Why Is My Microphone Showing Up In Windows/macos But Not In Obs?
This is a common scenario often caused by OBS not having the correct permissions or not being configured to use the device. Ensure you’ve selected the microphone under OBS Settings > Audio > Mic/Auxiliary Audio, or added it as an “Audio Input Capture” source in the Sources dock. Also, double-check your operating system’s privacy settings to ensure OBS is allowed to access the microphone.
My Mic Works In Other Apps, But Obs Shows No Audio Levels. What Should I Check?
Focus on OBS-specific settings. First, confirm the microphone is added as an Audio Input Capture source. Then, meticulously check the Audio Mixer panel: ensure the source is visible, not muted (speaker icon), and the fader is up. Review the Advanced Audio Properties for any unusual settings. Finally, temporarily disable any Filters applied to the microphone source in OBS, as a misconfigured filter can silence the input.
Can Background Applications Cause My Obs Mic To Stop Working?
Yes, absolutely. Applications like Discord, Zoom, Skype, or even some game overlays can sometimes hog the microphone or conflict with OBS’s access. Ensure these applications are fully closed (not just minimized) and check their audio settings to confirm they aren’t set to exclusive control.
Restarting your computer can also help clear any lingering processes that might be causing conflicts.
How Do I Check If My Microphone Is Muted Within Obs?
Check two main places:
- Audio Mixer: Look for the speaker icon next to your microphone’s fader in the Audio Mixer dock. If it’s red with a line through it, click it to unmute.
- Filters: Right-click your microphone source in the Sources dock, select Filters, and check if any filters (like Gain or a poorly configured Compressor) are set to excessively reduce the volume or mute the signal.
What Is “exclusive Mode” And Why Should I Disable It For Obs?
Exclusive Mode in Windows audio settings allows a single application to take full control of an audio device, preventing other applications from using it simultaneously. While sometimes useful for professional audio work, it frequently causes problems for streaming software like OBS, where multiple audio sources need to coexist.
Disabling Exclusive Mode (found in Microphone Properties > Advanced tab) ensures OBS can access the microphone even if another program briefly tries to use it.