
A persistently running toilet is more than just an annoyance; it’s a silent drain on your resources and a potential indicator of underlying plumbing issues. The constant swoosh of water can significantly inflate your water bill, and the sound itself can be incredibly disruptive.
While many homeowners might resign themselves to this watery predicament, understanding the common culprits behind a toilet that keeps running randomly is the first step toward a quiet, efficient bathroom and a healthier bank account. This common household problem often stems from a few key components within the toilet tank, and with a little troubleshooting, many can be resolved without the need for a professional plumber.
The good news is that most toilet running issues are relatively simple to diagnose and fix. The internal workings of a toilet tank, though appearing complex, rely on a few fundamental mechanisms to fill and flush correctly. When one of these parts malfunctions, it can lead to the continuous flow of water.
This guide will equip you with the knowledge to identify the cause of your phantom flushing and empower you to tackle the repair yourself, saving you both money and the stress of a constantly running commode.
Key Takeaways
- Flapper Valve Issues: A worn-out or improperly seated flapper is the most common cause of a running toilet, allowing water to constantly leak from the tank into the bowl.
- Fill Valve Malfunctions: A faulty fill valve can prevent the tank from shutting off water correctly after a flush, leading to continuous filling and running.
- Float Assembly Problems: The float, which signals the fill valve to stop, can become stuck or misadjusted, causing the toilet to overfill.
- Chain Length and Slack: An improperly adjusted chain connecting the flush lever to the flapper can lead to the flapper not sealing fully.
- Water Level Too High: If the water level in the tank is set too high, it can spill into the overflow tube, causing the toilet to run.
- Simple DIY Fixes: Many running toilet issues can be resolved with basic tools and replacement parts like flappers and fill valves.

Credit: www.youtube.com
Understanding Toilet Tank Mechanics
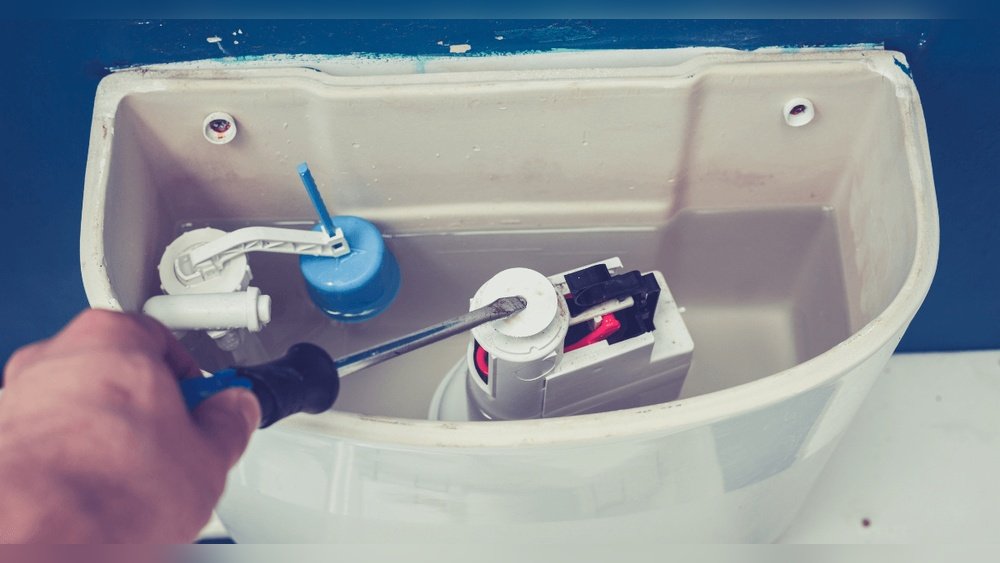
Before diving into troubleshooting, it’s essential to grasp the basic function of a toilet tank. The tank holds a reservoir of water that is released into the bowl to create a powerful flush. Once the flush is complete, a refill mechanism ensures the tank is ready for the next use.
The key components within the tank are:
- The Flapper: This is a rubber or plastic seal at the bottom of the tank that covers the flush valve opening. When you flush, the flapper lifts, allowing water to rush into the bowl. When the tank refills, the flapper reseals the opening.
- The Flush Valve: This is the assembly at the bottom of the tank where the flapper sits. It’s the gateway for water to enter the bowl.
- The Fill Valve (Ballcock): This mechanism controls the refilling of the tank. It opens to let water in when the tank is low and shuts off when the water reaches a predetermined level.
- The Float: Attached to the fill valve, the float rises with the water level. When it reaches a certain height, it signals the fill valve to shut off. This can be a ball float or a cup float.
- The Overflow Tube: A vertical pipe that prevents the tank from overflowing if the fill valve fails to shut off completely. Excess water flows down this tube into the toilet bowl.
- The Flush Lever and Chain: The external lever is connected by a chain to the flapper. Pulling the lever lifts the chain, which lifts the flapper.
A toilet that keeps running randomly is usually experiencing a failure in one or more of these components, preventing the system from reaching a stable “off” state after a flush.
The Culprit: A Leaky Flapper Valve
The most frequent offender when a toilet runs continuously is a faulty flapper valve. This rubber seal is designed to create a watertight barrier at the bottom of the tank. Over time, rubber degrades, becomes brittle, or warps due to constant contact with water and cleaning chemicals.
Signs Of A Failing Flapper
- Visible Wear and Tear: Inspect the flapper for cracks, tears, or a hardened, inflexible texture.
- Discoloration or Buildup: Mineral deposits or residue from toilet bowl cleaners can prevent the flapper from sealing properly against the flush valve seat.
- The “Dye Test”: A simple yet effective way to check for flapper leaks is the dye test. Add a few drops of food coloring or a dye tablet to the *tank* water (not the bowl). Wait 15-20 minutes without flushing. If the color appears in the *bowl*, your flapper is leaking.
Replacing A Flapper
Replacing a flapper is one of the easiest DIY plumbing tasks.
- Turn off the water supply: Locate the shut-off valve behind the toilet, usually on the left side, and turn it clockwise until it stops. Flush the toilet to empty the tank.
- Disconnect the old flapper: The flapper is typically attached to the overflow tube via two ears or clips. Unhook these. The chain connecting it to the flush lever may also need to be unhooked from the lever arm.
- Install the new flapper: Most flappers are universal. Attach the new flapper to the overflow tube using its ears. Ensure it sits flat and squarely.
- Connect the chain: Reconnect the chain to the flush lever arm. Crucially, adjust the chain length. There should be just a little slack, about 1/2 inch to 1 inch, when the flapper is seated. Too much slack, and the flapper won’t lift enough; too little slack, and it won’t allow the flapper to seal completely.
- Turn on the water and test: Turn the water supply valve counter-clockwise. Let the tank fill. Flush the toilet to test the new flapper and chain adjustment. Perform the dye test again to confirm the seal is now watertight.
A new flapper typically costs between $5 and $15, making this a very cost-effective repair.

Credit: www.wikihow.com
The Fill Valve: A Constant Flow Problem
If the flapper appears to be in good condition, the next likely suspect is the fill valve (also known as the ballcock). This component is responsible for refilling the tank after each flush and shutting off the water supply when the tank is full.
Common Fill Valve Failures
- Stuck Float: The float, whether a ball or a cup mechanism, rises with the water. If it gets stuck in the “up” position, it won’t signal the fill valve to shut off, leading to continuous water flow.
- Worn Seal or Diaphragm: Inside the fill valve, a seal or diaphragm controls water flow. If this part wears out, it can allow water to constantly trickle through, even when it should be closed.
- Improper Adjustment: The fill valve is designed to shut off at a specific water level, usually about 1/2 to 1 inch below the top of the overflow tube. If it’s set too high, water will continuously spill into the overflow tube.
Troubleshooting And Replacing The Fill Valve
- Check the Float: Gently push the float up. If the water flow stops or slows significantly, the float mechanism is likely the issue. If it’s a ball float, check if it has a leak and is filling with water, making it heavy and less effective. If it’s a cup float, ensure it moves freely up and down the shaft without obstruction.
- Adjust the Water Level: Most modern fill valves have an adjustment screw or clip to set the float height. Adjust it so the water level is about 1/2 inch below the top of the overflow tube. If you have an older ball float, there might be an adjustment screw where the float arm connects to the fill valve.
- Replacing the Fill Valve: If adjustment or cleaning doesn’t resolve the issue, the fill valve likely needs replacement.
- Turn off water supply and flush the toilet to empty the tank.
- Disconnect the refill tube from the overflow tube (it’s usually clipped on).
- Disconnect the water supply line from the bottom of the fill valve.
- Remove the old fill valve: There’s usually a large nut or locking ring at the bottom of the tank holding the valve in place. Unscrew this.
- Install the new fill valve: Follow the manufacturer’s instructions. This typically involves inserting the new valve from above, securing it with the nut from below, and reconnecting the water supply line.
- Reconnect the refill tube to the overflow tube.
- Turn on the water and test. Adjust the float height as needed.
Replacement fill valves are readily available and range from $15 to $30.
Credit: fusioncools.com
The Overlooked Overflow Tube And Water Level
The overflow tube plays a critical role in toilet safety, but it can also be the reason your toilet keeps running. As mentioned, if the water level in the tank is too high, it will spill directly into the overflow tube, creating a continuous flush cycle.
Why The Water Level Might Be Too High
- Incorrect Fill Valve Adjustment: This is the most common reason. The fill valve simply isn’t shutting off at the correct level.
- Faulty Fill Valve: Even if adjusted, a failing fill valve might not be able to stop the flow of water completely, leading to overfilling.
- Incorrect Flapper Installation: If the flapper is installed too high or is the wrong size, it might not seal properly, causing a constant slight leak that the fill valve tries to compensate for, leading to overfilling.
Checking And Adjusting The Water Level
- Observe the Water Line: After the toilet has finished its refill cycle, note where the water level sits relative to the overflow tube. The ideal level is about 1/2 to 1 inch below the top edge of the overflow tube.
- Adjust the Fill Valve: As described in the previous section, most fill valves can be adjusted. Turn the adjustment screw or reposition the clip until the water stops filling at the desired level.
- Dye Test (Again): If the water level is correct but the toilet still runs, it points back to a leaky flapper or a faulty fill valve that’s allowing a trickle.
The Chain Reaction: Flush Lever And Chain Issues
The connection between the flush lever and the flapper is through a chain. The length and tension of this chain are crucial for proper operation.
Problems With The Chain
- Too Long: If the chain has too much slack, it won’t lift the flapper high enough to allow a full flush, or it might get caught under the flapper, preventing it from sealing properly. This is a very common cause of a toilet that runs intermittently or constantly.
- Too Short: A chain that is too taut can hold the flapper slightly ajar, leading to a constant leak.
- Kinks or Snags: A twisted or kinked chain can prevent the flapper from seating correctly.
- Dislodged Hook: The chain might simply have come off the flush lever arm.
Adjusting The Chain
- Check for Slack: With the tank lid off and the toilet refilled, observe the chain. There should be just a small amount of slack, enough to allow the flapper to rest fully on the flush valve seat, but not so much that it bunches up.
- Adjust the Length: Most flush lever arms have multiple holes to attach the chain, allowing for easy length adjustment. If your chain has a clip, you can adjust the length by moving the clip to a different link. Aim for about 1/2 to 1 inch of slack when the flapper is closed.
- Untangle: Ensure the chain is straight and not snagged on anything inside the tank.
Less Common Causes And Advanced Troubleshooting
While the flapper, fill valve, and chain account for the vast majority of running toilet issues, a few other less common problems can occur.
Tank-to-bowl Gasket Leak
The gasket that seals the tank to the bowl can degrade over time. If this seal fails, water can leak from the tank into the bowl, causing the fill valve to constantly try and replenish the lost water.
- Symptoms: You might hear a faint hissing sound, or notice water pooling around the base of the toilet. The dye test (applied to the tank) would show color in the bowl, but the flapper would appear to be sealing perfectly.
- Fix: This involves removing the tank from the bowl, replacing the large gasket at the bottom of the tank, and reassembling. This is a more involved DIY task, often requiring a specific tank-to-bowl gasket kit.
Cracked Tank Or Bowl
Though rare, a hairline crack in the porcelain of the tank or bowl can lead to slow leaks.
- Symptoms: Similar to a gasket leak, but the source might be harder to pinpoint. Water might seep through the porcelain.
- Fix: Small cracks can sometimes be temporarily sealed with epoxy, but it’s generally recommended to replace the entire tank or toilet. This is a job best left to professionals.
Issues With The Flush Valve Seat
The flush valve seat is the surface the flapper seals against. If this surface is corroded, warped, or has debris on it, the flapper won’t create a watertight seal.
- Symptoms: The dye test will reveal a leak, but the flapper itself looks fine.
- Fix: Sometimes, simply cleaning the flush valve seat thoroughly can resolve the issue. If it’s corroded or damaged, you might need to replace the entire flush valve assembly, which is a more complex repair.
Water Saving Tips And Maintenance
Preventing a running toilet in the first place is always better than fixing it. Regular maintenance can save you money and hassle.
- Regular Inspections: Periodically check your toilet’s internal mechanisms for wear and tear. Perform the dye test every few months.
- Avoid Harsh Cleaners: Some aggressive toilet bowl cleaners can accelerate the degradation of rubber parts like flappers. Opt for milder cleaners or natural alternatives.
- Listen for Changes: Pay attention to any new sounds your toilet makes, such as hissing or gurgling, which might indicate an impending issue.
- Know Your Parts: Familiarize yourself with the parts inside your toilet tank. Understanding their function makes troubleshooting much easier. Many manufacturers provide diagrams online for specific models.
- Consider Water-Saving Technologies: If you’re replacing parts, consider upgrading to a modern, water-efficient fill valve or flapper.
Data Snapshot: The Cost Of A Running Toilet
The impact of a running toilet on your water bill can be significant. According to the U.S. Environmental Protection Agency (EPA), a continuously running toilet can waste up to 200 gallons of water per day.
Let’s break down the potential cost:
| Toilet Condition | Daily Water Waste (Gallons) | Monthly Water Waste (Gallons) | Estimated Monthly Cost (at $4.50 per 1000 gallons) |
|---|---|---|---|
| Slightly Leaky Flapper | 50 | 1500 | $6.75 |
| Moderately Running Toilet | 100 | 3000 | $13.50 |
| Continuously Running Toilet | 200 | 6000 | $27.00 |
*Note: Water rates vary significantly by region. This is an illustrative example.*
This doesn’t even account for the potential increase in sewer charges, which are often based on water usage. A simple fix can therefore lead to substantial savings over time.
When To Call A Professional Plumber
While many running toilet issues are DIY-friendly, there are times when calling a professional is the wisest course of action.
- Uncertainty: If you’ve tried the basic troubleshooting steps and are still unsure of the cause, a plumber has the expertise to diagnose the problem quickly.
- Complex Repairs: Issues like a cracked tank, a damaged flush valve seat requiring replacement, or persistent leaks after multiple attempts at repair often necessitate professional intervention.
- Multiple Leaks: If you suspect leaks in multiple areas or are dealing with a persistent problem that keeps recurring, a plumber can identify underlying systemic issues.
- Lack of Tools or Time: If you don’t have the necessary tools or the time to dedicate to the repair, hiring a plumber ensures the job is done correctly and efficiently.
A plumber’s visit might cost anywhere from $100 to $300 or more, depending on your location and the complexity of the repair. However, this cost can be offset by the savings from a properly functioning, water-efficient toilet and the avoidance of potential water damage.
Common Toilet Brands And Their Parts
While many toilet parts are standardized, some manufacturers use proprietary designs. Knowing your toilet’s brand can be helpful when purchasing replacement parts.
| Brand | Common Fill Valve Type | Common Flapper Type | Notes |
|---|---|---|---|
| **Kohler** | Fluidmaster or proprietary | Specific Kohler flappers, universal options available | Often uses a specific mounting style for fill valves. |
| **American Standard** | Fluidmaster or proprietary | Universal flappers, some specific models | Known for reliable, standard parts. |
| **Toto** | Proprietary (often unique) | Specific Toto flappers, some universal compatibility | Toto is known for innovative designs, sometimes requiring specific parts. |
| **Mansfield** | Fluidmaster or proprietary | Universal flappers | Generally uses more standard components. |
| **Eljer** | Fluidmaster or proprietary | Universal flappers | Similar to American Standard in part compatibility. |
When in doubt, taking a photo of your current parts or bringing the old part to the hardware store can ensure you get the correct replacement. You can often find model numbers on the back of the tank or inside the lid. For more detailed information on specific models, checking the manufacturer’s website is recommended. For instance, the EPA’s WaterSense program offers resources on toilet efficiency and troubleshooting.
Frequently Asked Questions
What Is The Most Common Reason A Toilet Runs Randomly?
The most frequent cause is a worn-out or improperly seated flapper valve. This rubber seal at the bottom of the tank degrades over time, allowing water to continuously leak from the tank into the bowl. This leak triggers the fill valve to constantly add water to the tank, resulting in the running sound.
How Can I Tell If My Toilet Flapper Is Bad?
The easiest method is the dye test. Add a few drops of food coloring to the water in the *tank*. Wait for about 15-20 minutes without flushing. If you see color appear in the toilet *bowl*, it means water is leaking past the flapper, indicating it needs replacement. You can also visually inspect the flapper for cracks, stiffness, or visible damage.
My Toilet Fills Up Too High And Runs Into The Overflow Tube. What’s Wrong?
This usually means the fill valve is not shutting off correctly or is adjusted improperly. The float mechanism attached to the fill valve might be stuck, or the valve itself might be failing, allowing too much water into the tank. Adjust the float so the water level sits about half an inch to an inch below the top of the overflow tube. If adjustment doesn’t work, the fill valve likely needs replacement.
Can A Toilet Run Constantly Even If The Flapper Looks Fine?
Yes, absolutely. While a bad flapper is common, a faulty fill valve can also cause a toilet to run constantly. The fill valve controls the water entering the tank. If its internal seal is compromised or the float mechanism is malfunctioning, it may fail to shut off the water supply completely, leading to continuous filling and running.
How Much Does It Typically Cost To Fix A Running Toilet?
If you perform the repair yourself, the cost is minimal, usually ranging from $5 to $30 for replacement parts like a flapper or fill valve. If you hire a professional plumber, expect to pay anywhere from $100 to $300 or more, depending on the complexity of the issue and your local labor rates.
A persistently running toilet is a common household nuisance that often stems from simple mechanical failures within the tank. By understanding the roles of the flapper, fill valve, float, and overflow tube, homeowners can effectively diagnose and often repair the issue themselves, leading to significant water and cost savings.
Regularly inspecting these components and addressing minor wear and tear promptly can prevent the annoyance and expense associated with a constantly flowing commode. If troubleshooting becomes too complex or the problem persists, don’t hesitate to consult a qualified plumber to ensure your plumbing system functions efficiently and reliably.