
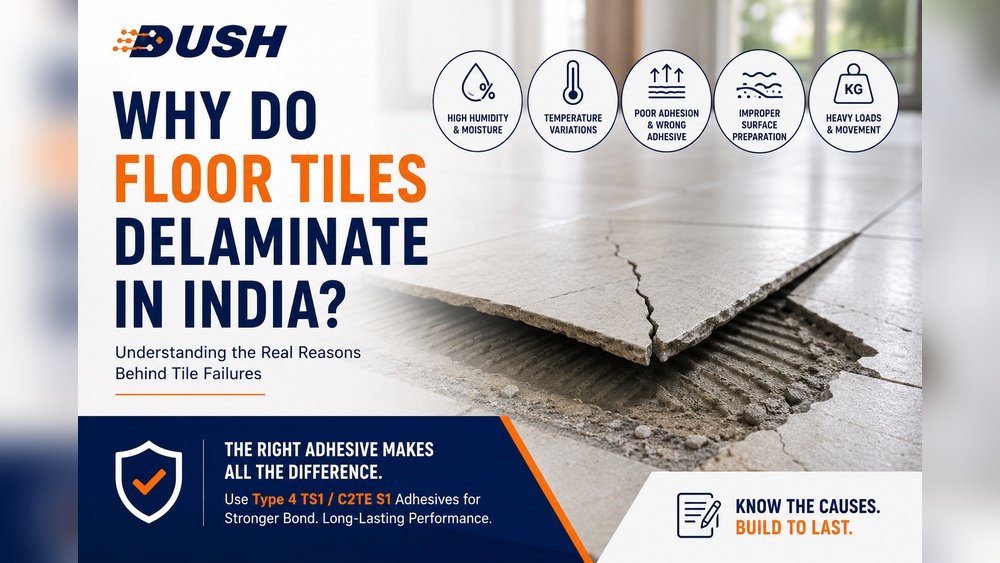
Cracked floor tiles can be a disheartening sight in any home or commercial space. What initially appears as a minor cosmetic issue can often signal underlying structural problems that, if left unaddressed, can lead to more significant and costly repairs.
From the subtle spiderweb cracks to complete tile fragmentation, the reasons behind this common tiling woe are varied and complex, stemming from everything from improper installation to environmental stressors. Understanding these causes is the first crucial step towards effective diagnosis and, more importantly, robust prevention.
This comprehensive guide will equip you with the knowledge to identify why your floor tiles are cracking, how to diagnose the root cause, and, most importantly, how to prevent future occurrences. We’ll explore the intricate interplay between subfloors, adhesives, grout, and the tiles themselves, shedding light on how each component contributes to the integrity of your tiled surface and what can go wrong.
By delving into the specifics of material science, installation techniques, and environmental factors, you’ll be empowered to protect your investment and maintain the beauty and functionality of your tiled floors for years to come.
Key Takeaways
- Subfloor Issues are Primary: Most tile cracking originates from movement or instability in the subfloor, including insufficient support, improper expansion gaps, or moisture damage.
- Adhesive and Grout Matter: The type and application of tile adhesive and grout significantly impact tile durability; using the wrong products or poor technique can lead to failure.
- Environmental Factors Play a Role: Extreme temperature fluctuations, high humidity, and excessive moisture can stress tiles and their bond to the subfloor.
- Impact and Stress Cause Cracks: Heavy impacts, concentrated loads, and vibrations can directly fracture tiles.
- Proper Installation is Paramount: Correct substrate preparation, appropriate underlayment, precise adhesive troweling, and proper grouting techniques are essential for longevity.
- Regular Maintenance Aids Prevention: Keeping grout lines clean, addressing spills promptly, and monitoring for signs of moisture can help prevent cracking.

Credit: stelr.com
Understanding The Anatomy Of A Tiled Floor
Before diving into the specifics of cracking, it’s vital to appreciate the layered construction of a typical tiled floor. This understanding forms the basis for diagnosing issues, as problems often arise from the interaction between these layers. A well-installed tiled floor is more than just tiles and grout; it’s a system designed to withstand daily wear and tear.
The Subfloor: The Foundation’s Foundation
The subfloor is the structural layer beneath the tile and its setting materials. Its primary role is to provide a rigid, stable base for the finished flooring. Common subfloor materials include concrete slabs and wood-based panels like plywood or oriented strand board (OSB).
- Concrete Slabs: These are generally very stable but can be prone to cracking themselves due to settlement, thermal expansion/contraction, or hydrostatic pressure. If the concrete cracks, the tiles above will likely follow.
- Wood-Based Subfloors: These are more susceptible to movement. They can flex, warp, or expand/contract with changes in temperature and humidity. Inadequate thickness, poor support from joists, or improper fastening can all lead to excessive deflection, which is a major contributor to tile cracking.
Underlayment: The Protective Buffer
An underlayment is a layer installed between the subfloor and the tile setting material. It serves several crucial purposes:
- Crack Isolation: It acts as a barrier, preventing minor subfloor cracks from telegraphing through to the tile surface. Materials like uncoupling membranes are specifically designed for this.
- Moisture Protection: Some underlayments offer a vapor barrier, protecting the subfloor from moisture that might seep through grout lines or from beneath.
- Sound Dampening: Certain underlayments can reduce noise transmission.
- Adhesion Enhancement: Some underlayments provide a better bonding surface for tile adhesive than the raw subfloor.
Adhesives And Mortar: The Bonding Agent
Thin-set mortar or tile adhesive is the substance that bonds the tile to the underlayment or subfloor. The type of adhesive used is critical and depends on the tile material, the substrate, and the environment.
- Thin-set Mortar: A cement-based adhesive, it’s the industry standard for most tile installations, especially for ceramic and porcelain tiles. It offers superior bond strength and water resistance.
- Mastic: A pre-mixed, mastic-based adhesive, it’s easier to work with but generally less durable and water-resistant than thin-set. It’s typically recommended only for specific interior applications with non-porous tiles.
The troweling technique for applying adhesive is also crucial. Using the wrong size trowel can result in insufficient coverage, leaving voids beneath the tiles. When a tile is subjected to stress and there are voids, it has no support, making it highly susceptible to cracking.
Grout: Filling The Gaps
Grout fills the spaces between tiles. While it contributes to the aesthetic of the floor, it also plays a functional role by protecting the edges of the tiles from chipping and preventing moisture from seeping beneath the tiles.
- Cementitious Grout: The most common type, it can be sanded (for wider joints) or unsanded (for narrower joints). It’s porous and can absorb moisture and stains if not sealed.
- Epoxy Grout: Highly durable, stain-resistant, and waterproof, but more expensive and complex to install.
Cracked grout is often an early indicator of underlying tile or subfloor movement.
Common Reasons For Floor Tile Cracking
Tile cracking is rarely a spontaneous event. It’s typically the result of one or a combination of factors that stress the tile beyond its breaking point. Identifying the specific reason is key to successful repair and prevention.
Credit: renders-world.co.uk
Subfloor Instability And Movement
This is arguably the most prevalent cause of tile cracking. Tiles themselves are rigid and brittle; they cannot accommodate significant movement. If the foundation beneath them moves, the tiles bear the brunt of the stress.
Excessive Subfloor Deflection
Deflection refers to the amount a floor joist system bends under load. Building codes specify maximum allowable deflection limits (e.g., L/360 or L/720 for tile installations) to ensure rigidity.
- Causes: Insufficiently sized joists, widely spaced joists, lack of blocking or bracing between joists, or using thin subfloor panels.
- Impact: As the floor flexes underfoot, the tiles are subjected to bending forces. This can cause them to crack, often in the center of the tile or along the grout lines. In my experience, this is the most common culprit in older homes or renovations where subfloor structure wasn’t adequately reinforced for tile.
Subfloor Cracks
If the concrete slab or wooden subfloor itself develops cracks, these can transfer directly to the tiles installed above.
- Causes: Concrete shrinkage during curing, settlement of the foundation, freeze-thaw cycles, heavy impact loads, or inadequate expansion joints in concrete slabs.
- Impact: A crack in the subfloor creates a line of weakness. When weight is applied over this line, the tile is forced to bend, leading to a crack that mirrors the subfloor defect.
Improper Expansion Gaps
Materials expand and contract with temperature and humidity changes. Tiles and the substrate beneath them are no exception.
- Causes: Failure to leave adequate expansion joints around the perimeter of the room and at large intervals within the field of the tile, particularly in areas with significant temperature fluctuations.
- Impact: Without space to expand, tiles and the substrate push against each other, creating immense pressure that can cause tiles to buckle, lift, or crack. This is especially common in rooms with direct sunlight or near heating/cooling vents.
Moisture Damage To Wood Subfloors
Wood-based subfloors are susceptible to moisture. Water can penetrate through grout lines, leaks, or high humidity.
- Causes: Spills not cleaned up, faulty plumbing, inadequate waterproofing in wet areas (bathrooms, kitchens), or high ambient humidity.
- Impact: Moisture causes wood to swell. As it dries, it shrinks. This constant expansion and contraction weakens the wood, leading to instability and deflection. It can also promote mold and rot, further compromising the subfloor’s integrity.

Credit: tileshoppes.com
Installation Errors
Even with a perfect subfloor, installation mistakes can create vulnerabilities that lead to cracking.
Inadequate Tile Adhesive Coverage
The bond between the tile and the substrate is critical. If there are voids beneath the tile, it lacks proper support.
- Causes: Using the wrong size trowel for the tile and adhesive, not back-buttering larger format tiles, or adhesive drying out too quickly before the tile is set.
- Impact: Areas without adhesive support are weak points. When walked on, especially near the edges of these unsupported areas, the tile can easily break. This often results in cracks that appear as if the tile has been hit from below.
Incorrect Adhesive Or Grout Type
Using the wrong type of adhesive or grout for the specific tile and application can lead to premature failure.
- Causes: Using mastic in wet areas, using unsanded grout with large grout joints (which can crumble), or using a flexible adhesive on a rigid substrate that requires a rigid bond.
- Impact: The adhesive may not bond properly, or the grout may not be durable enough, leading to premature wear, cracking, or disintegration, which can then stress the tiles.
Improper Grouting Technique
While grout is the last layer, improper application can still contribute to tile issues.
- Causes: Grout not being fully packed into the joints, allowing voids, or not cleaning excess grout off the tile surface properly, which can lead to efflorescence or staining that masks underlying issues.
- Impact: While less direct, poorly packed grout can allow moisture ingress, and if the grout fails prematurely, it can lead to edge chipping and can indirectly stress tiles if significant movement occurs.
Environmental Factors
The surrounding environment exerts forces on tiled surfaces.
Temperature Fluctuations
Significant changes in temperature can cause materials to expand and contract at different rates.
- Causes: Extreme seasonal changes, proximity to heating/cooling vents, direct sunlight on dark tiles, or uninsulated spaces.
- Impact: Differential expansion and contraction between tiles, adhesive, substrate, and grout can create stress. This is particularly problematic for large format tiles or in areas where expansion joints were omitted.
Excessive Moisture And Humidity
High levels of moisture can affect both the tiles and the substrate.
- Causes: Poor ventilation in bathrooms or kitchens, steam from showers, frequent spills, or humidity in basements.
- Impact: For porous tiles and cementitious grout, moisture absorption can lead to staining and can weaken the bond over time. For wood subfloors, it causes swelling and potential rot. For concrete, it can contribute to hydrostatic pressure issues.
Physical Stress And Impact
Direct forces applied to the tiles can cause them to break.
Heavy Impacts
Dropping heavy objects onto the tile floor is a direct cause of cracking.
- Causes: Dropping pots, pans, tools, or other heavy items.
- Impact: The force of impact can exceed the tile’s tensile strength, causing it to fracture. The location and severity of the impact dictate the nature of the crack.
Concentrated Loads
Placing extremely heavy furniture or appliances on a tiled floor without proper support can create stress points.
- Causes: Heavy refrigerators, pianos, or filing cabinets placed directly on tiles.
- Impact: The weight is concentrated on small contact points (like the feet of furniture). If the subfloor and underlayment are not rigid enough to distribute this weight, the tile directly beneath the contact point can crack.
Vibrations
Constant or strong vibrations can fatigue the tile and its setting materials over time.
- Causes: Proximity to heavy machinery, industrial settings, or even washing machines/dryers placed directly on a tile floor without adequate dampening.
- Impact: Persistent vibrations can weaken the bond between the tile and adhesive, and potentially lead to micro-fractures that eventually develop into visible cracks.
Diagnosing The Cause Of Tile Cracking
Accurately diagnosing why your tiles are cracking is essential for implementing the correct repair and prevention strategy. A visual inspection is the first step, but often further investigation is needed.
Visual Inspection: What To Look For
Start by carefully examining the cracked tiles and their surroundings.
- Crack Pattern:
- Spiderweb cracks: Often indicate impact or stress concentrated on the tile surface.
- Cracks radiating from corners or edges: Suggest stress points, possibly from subfloor movement or improper edge support.
- Cracks along grout lines: Can point to movement between tiles or inadequate grout fill.
- Cracks in the center of the tile: Frequently indicate subfloor deflection or insufficient adhesive coverage.
- Grout Condition: Are the grout lines intact, or are they crumbling, cracked, or missing in areas? This can signal movement.
- Tile Edges: Are the tiles lifting or chipped at the edges? This often points to expansion issues or subfloor movement.
- Substrate Condition (if visible): If you can see the edges of the tiles or have access to the subfloor, look for signs of moisture, warping, or cracks in the substrate itself.
Probing For Voids: The Tap Test
A simple yet effective diagnostic tool is the tap test. Gently tap each tile with a metal object (like a screwdriver handle or a small hammer).
- Solid Sound: A solid, consistent sound indicates good adhesion between the tile and the substrate.
- Hollow Sound: A hollow or dull sound suggests a void beneath the tile, meaning poor adhesive coverage. Tiles producing a hollow sound are at high risk of cracking or may already be compromised.
Checking Subfloor Rigidity
Assess the subfloor’s stability.
- Walk the Floor: Does the floor feel spongy, bouncy, or flex significantly when walked upon? This indicates excessive deflection.
- Check for Gaps: Inspect perimeter expansion gaps. Are they present and adequately sized?
- Moisture Meter: If you suspect moisture issues with a wood subfloor, use a moisture meter to check humidity levels.
Investigating Underlayment And Substrate
If possible, try to gain access to the layers beneath the tile.
- Exposed Edges: Look at the edges of the tiles where they meet walls or fixtures. Can you see the underlayment? Is it intact?
- Small Access Panels: In kitchens or bathrooms, there might be access panels to plumbing. These can sometimes offer a glimpse of the subfloor and underlayment.
- Professional Assessment: For a thorough diagnosis, especially if subfloor issues are suspected, consulting a professional tile installer or building inspector is highly recommended. They have specialized tools and experience to pinpoint the root cause.
Comparison Of Common Tile Cracking Causes
To help clarify the distinct nature of different cracking causes, consider this comparative overview:
| Symptom/Observation | Likely Cause: Subfloor Instability | Likely Cause: Installation Error (Adhesive) | Likely Cause: Environmental Stress | Likely Cause: Physical Impact |
|---|---|---|---|---|
| Crack Pattern | Often mirrors subfloor cracks; cracks in center of tiles; buckling at edges. | Cracks in center of tiles; spiderwebbing over unsupported areas. | Cracks often near edges or corners; buckling; cracks radiating from tile centers. | Sharp, localized cracks, often radiating from impact point; shattering. |
| Grout Condition | May be cracked or crumbling due to tile movement. | Typically normal, unless movement causes grout stress. | May be stressed or cracked if tiles expand/contract significantly. | May be chipped or cracked around the impact site. |
| Tap Test Results | Can be solid if the crack is purely from subfloor deflection, or hollow if adhesive also failed. | Predominantly hollow sound indicating voids. | Usually solid unless movement also caused adhesive failure. | Often solid, but can be hollow if impact dislodged tile from adhesive. |
| Floor Feel | Spongy, bouncy, or flexible when walked upon. | May feel solid if subfloor is rigid, but tiles crack due to lack of support. | May feel solid, but stress builds up. | Usually feels solid. |
| Location of Cracks | Widespread, often in multiple tiles; follows structural lines. | Can be localized to areas with poor troweling. | Often found in areas of extreme temperature or humidity exposure. | Concentrated at the point of impact. |
Prevention Strategies: Building For Durability
Preventing tile cracking involves a proactive approach, focusing on solid preparation, correct materials, and meticulous installation techniques.
Robust Subfloor Preparation
The foundation of a durable tiled floor starts with a stable and properly prepared subfloor.
- Ensure Rigidity: For wood-framed floors, ensure joists are adequately sized and spaced according to local building codes. Add blocking or bracing between joists to minimize deflection. Use subfloor panels of appropriate thickness (e.g., 3/4-inch plywood or OSB is often recommended). Fasten subfloor panels securely with screws, not nails, to prevent loosening over time.
- Address Concrete Cracks: For concrete slabs, repair existing cracks using epoxy injection or appropriate crack filler before tiling. Consider a crack isolation membrane.
- Moisture Mitigation: In areas prone to moisture (bathrooms, kitchens, basements), ensure proper vapor barriers are installed beneath the tile assembly, especially over concrete slabs. Ensure adequate ventilation.
- Leveling: The subfloor must be flat and level. Use self-leveling underlayment if necessary to achieve a smooth, consistent surface.
Utilize Appropriate Underlayment
An underlayment is not optional for most tile installations; it’s a critical component for longevity.
- Crack Isolation Membranes: Install a high-quality crack isolation membrane (like Schluter-DITRA or similar products) over the subfloor. These membranes decouple the tile from the substrate, absorbing minor movements and preventing cracks from migrating upwards.
- Waterproofing: In wet areas, use a liquid-applied or sheet membrane waterproofing underlayment to protect the subfloor and surrounding structures from water damage.
- Follow Manufacturer Guidelines: Always adhere to the specific installation instructions provided by the underlayment manufacturer.
Proper Adhesive And Grout Selection And Application
The materials that hold the tile in place are just as important as the substrate.
- Choose the Right Adhesive: Use a high-quality, polymer-modified thin-set mortar suitable for your specific tile type (e.g., porcelain, natural stone) and substrate. Consult tile manufacturer recommendations. Avoid mastic for floor tiles or in wet areas.
- Ensure Full Coverage: Use the correct trowel size recommended by the adhesive manufacturer for your tile size. For tiles larger than 12×12 inches, back-buttering (applying a thin layer of adhesive to the back of the tile in addition to troweling it on the floor) is highly recommended to ensure 100% coverage.
- Select Appropriate Grout: Use sanded grout for joints 1/8-inch or wider and unsanded grout for narrower joints. Consider epoxy grout for high-traffic areas or where maximum stain and moisture resistance is needed, though its installation is more demanding.
- Proper Grouting Technique: Ensure grout is thoroughly packed into all joints. Clean excess grout promptly from the tile surface according to the manufacturer’s instructions to prevent staining.
Strategic Installation Practices
Beyond materials, the method of installation is key.
- Expansion Joints: Crucially, install expansion joints around the perimeter of the room (where the tile meets walls, cabinets, etc.) And at regular intervals in large floor areas (typically every 20-25 feet in each direction). These joints should be filled with flexible sealant, not grout.
- Tile Spacing: Maintain consistent grout joint widths. Too tight a joint can lead to edge-to-edge stress.
- Acclimatization: Allow tiles and setting materials to acclimatize to the room’s temperature and humidity before installation.
Ongoing Maintenance
Even a perfectly installed floor benefits from regular care.
- Regular Cleaning: Keep floors clean to prevent dirt and grit from acting as abrasives, which can wear down grout and potentially damage tile edges over time.
- Seal Grout: If using cementitious grout, seal it periodically (usually annually) to protect it from stains and moisture penetration.
- Address Spills Promptly: Clean up spills immediately, especially water, oil, or acidic substances.
- Protect High-Traffic Areas: Use mats at entryways and consider felt pads under furniture legs to minimize scratching and wear.
- Monitor for Issues: Periodically inspect your floor for any signs of new cracks, loose tiles, or deteriorating grout. Address small issues before they become major problems.
Case Studies: Learning From Real-world Scenarios
Examining specific situations can further illuminate the causes and solutions for tile cracking.
Case Study 1: The Bowing Bathroom Floor
A homeowner in a humid climate noticed several porcelain tiles cracking in their upstairs bathroom, particularly near the shower. The grout lines were also showing signs of stress.
- Diagnosis: Upon inspection, the floor felt slightly spongy. Access to the