
A toilet that won’t flush can turn a simple convenience into a significant household annoyance. When the flush button or lever is unresponsive, it disrupts daily routines and can quickly lead to unsanitary conditions if not addressed promptly. While modern dual-flush toilets and concealed cisterns offer aesthetic appeal and water-saving benefits, their push-button mechanisms can sometimes present unique troubleshooting challenges compared to traditional lever-operated systems. Understanding the potential causes behind a malfunctioning push-button toilet is the first step towards a swift and effective resolution.
This guide will equip you with the knowledge to diagnose and fix common issues with your push-button toilet. We’ll explore everything from simple adjustments to more complex internal component failures, providing clear, step-by-step instructions to get your toilet back in working order.
Whether you’re dealing with a button that doesn’t press, a flush that doesn’t initiate, or a weak flush, you’ll find the solutions you need right here.
Key Takeaways
- Identify the Mechanism: Push buttons operate via internal mechanisms like plungers, rods, or cables that lift a flush valve. Issues often stem from these components.
- Check for Obstructions: Debris or mineral buildup can prevent buttons from depressing or internal parts from moving freely.
- Adjust Linkages: The connection between the button and the flush valve might be loose, misaligned, or broken, requiring adjustment or replacement.
- Inspect the Flush Valve: The flush valve itself, located at the bottom of the cistern, is a common culprit for flushing problems, even if the button seems fine.
- Water Level Matters: An incorrect water level in the cistern can lead to weak flushes or no flush at all.
- Consider Button Type: Different push-button designs (single, dual-flush, concealed) have specific parts and potential failure points.
- DIY vs. Professional: Many common issues can be fixed with basic tools, but complex internal cistern problems may require a plumber.
Credit: www.youtube.com
Understanding Your Push-button Toilet Mechanism
Before diving into troubleshooting, it’s crucial to understand how your specific push-button toilet works. Unlike the familiar lever that directly engages a chain or rod, push buttons typically operate through a more intricate system within the cistern. The design varies significantly between manufacturers and toilet models, but the fundamental principle involves a mechanism that, when pressed, lifts the flush valve to release water from the cistern into the bowl.
Types Of Push-button Mechanisms
Push buttons come in several common configurations:
- Single-Button Flush: A single button, when pressed, initiates a full flush. These are often found on older or simpler models.
- Dual-Flush Buttons: These systems feature two buttons (often one larger, one smaller, or a split button) that offer different flush volumes, a reduced flush for liquid waste and a full flush for solid waste. This is a key feature for water conservation.
- Concealed Cistern Push Plates: In wall-hung or back-to-wall toilet setups, the cistern is hidden within the wall cavity, and a decorative push plate on the wall activates the flush. These plates often have mechanical or pneumatic linkages.
- Adjustable Rods/Cables: Some button mechanisms use rods or cables that connect the button assembly to the flush valve. The length and tension of these can be critical.
Common Internal Components
Regardless of the specific type, several key components are involved:
- Button Assembly: The part you physically press. This might be a simple plunger or a more complex lever system.
- Linkage Rods/Cables: These connect the button assembly to the flush valve mechanism.
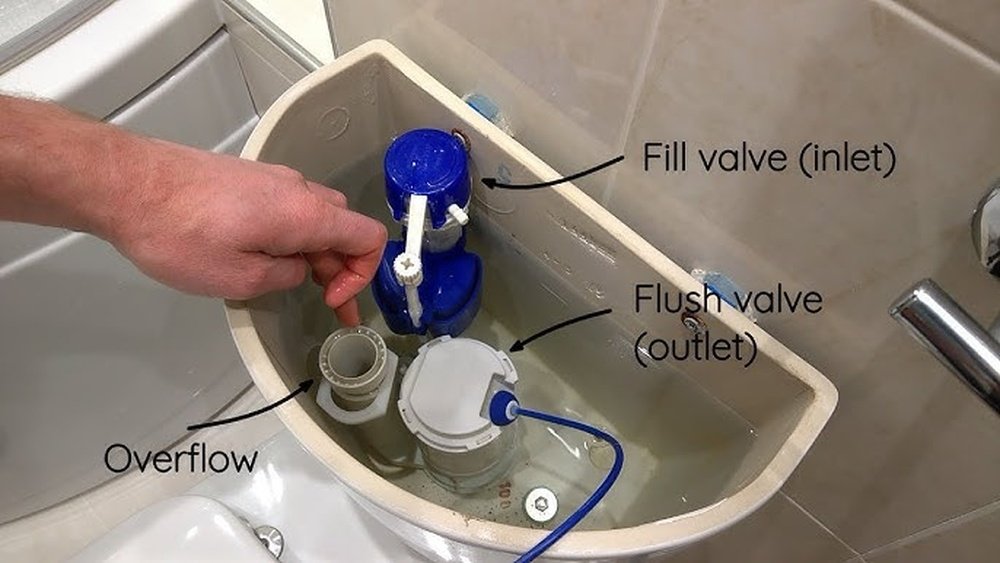
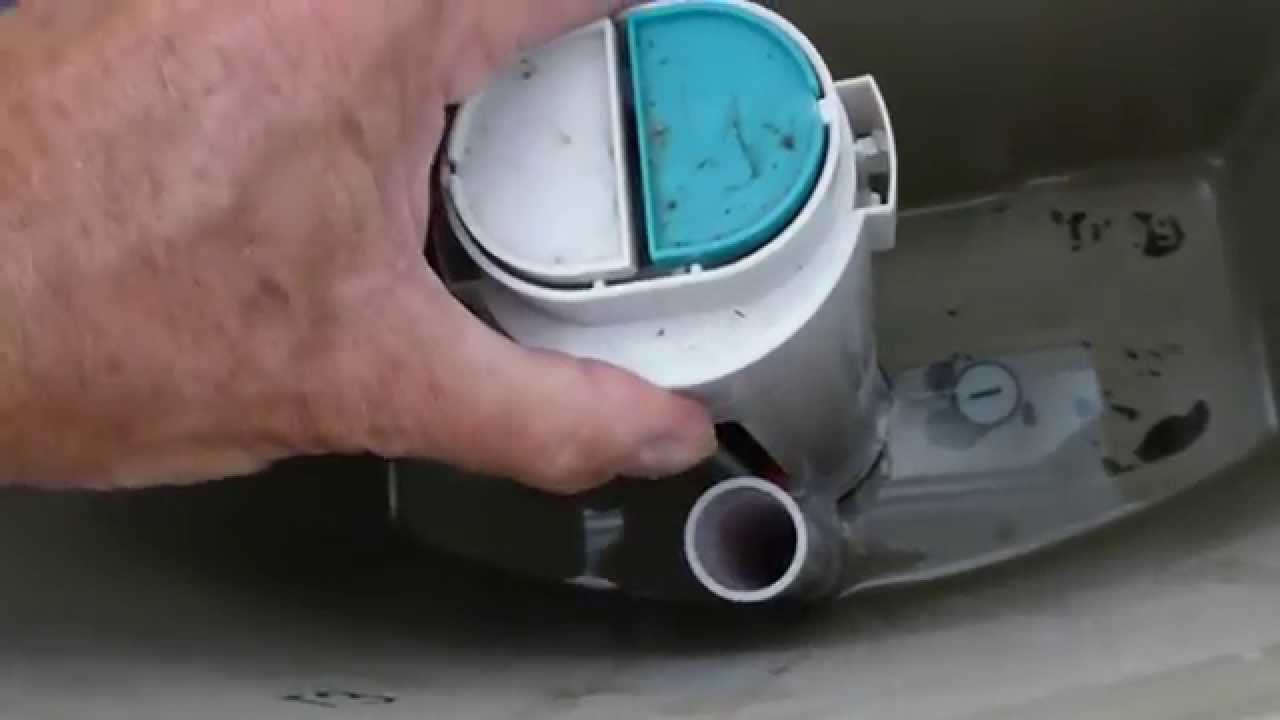
- Flush Valve Seal/Diaphragm: A rubber seal at the bottom of the cistern that holds back the water. When lifted, it allows water to flow into the bowl.
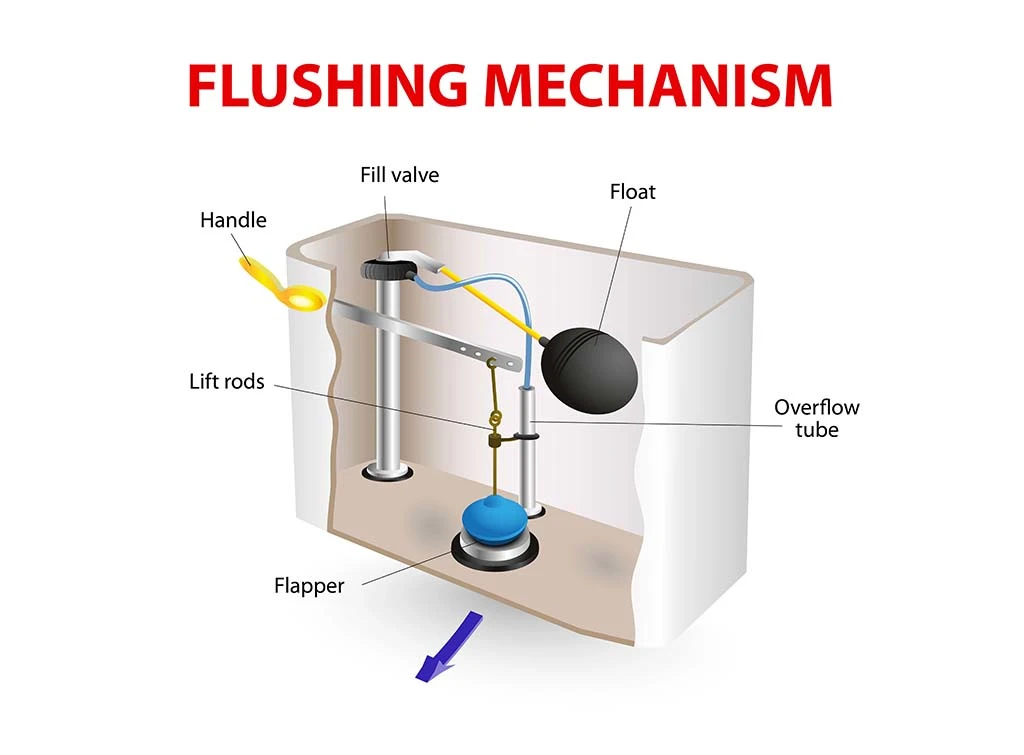
- Overflow Pipe: A vertical pipe within the cistern that prevents water from exceeding a safe level.
- Float Valve (Fill Valve): Controls the refilling of the cistern after a flush. While not directly related to the button, an improperly functioning fill valve can affect flush performance.
Troubleshooting A Non-responsive Push Button
The most common symptom is a button that feels loose, doesn’t depress, or doesn’t initiate a flush when pressed. This usually points to an issue with the button assembly or its direct linkage to the flush valve.
Button Feels Loose Or Wobbly
A loose button often indicates that the retaining nut holding the button assembly to the cistern lid is loose.
- Remove the Cistern Lid: Carefully lift the ceramic lid off the cistern.
- Locate the Nut: On the underside of the cistern lid, you’ll find the threaded housing for the push button. There’s usually a large plastic nut securing the entire assembly.
- Tighten the Nut: Use your hand or pliers (with a cloth to prevent scratching) to tighten this nut. Be firm but avoid overtightening, which can crack the plastic or ceramic.
- Test: Replace the lid and test the button.
Pro Tip: If the nut is difficult to grip or in a tight space, a basin wrench can be invaluable for reaching and tightening it.
Button Does Not Depress
If the button is stuck in the ‘out’ position and won’t move inward, several factors could be at play:
- Obstruction: Debris, limescale, or even a dislodged internal component can jam the button.
- Remove the cistern lid.
- Examine the button mechanism. Gently try to wiggle it. If it feels stuck, look for any visible obstructions around the button’s housing.
- If you see buildup, use a damp cloth or an old toothbrush to clean around the button. For stubborn limescale, a mild descaler might be necessary, but use it sparingly and rinse thoroughly.
- Ensure the linkage rod or cable isn’t bent or caught.
- Misaligned Mechanism: The button assembly might have shifted, causing it to bind.
- Loosen the retaining nut slightly.
- Reposition the button assembly so it moves freely.
- Retighten the nut.
- Internal Component Failure: The internal part of the button assembly that connects to the linkage might be broken. This often requires replacing the entire button assembly.
Button Depresses, But No Flush Occurs
This is a more complex issue, indicating that while the button is moving, the signal isn’t reaching or activating the flush valve.
- Check Linkage:
- Rod Systems: Ensure the rod connecting the button to the flush valve is still attached at both ends and is not bent. If it’s detached, reattach it. If it’s bent, try to straighten it carefully or replace it.
- Cable Systems: Check that the cable is connected and taut. A slack cable won’t lift the flush valve sufficiently. Some cable systems have an adjustment screw near the button assembly or the flush valve.
- Inspect Flush Valve: The problem might lie with the flush valve itself.
- Stuck Flush Valve: The seal at the bottom of the flush valve might be stuck due to debris or wear.
- Worn Seal: The rubber seal on the flush valve might be perished or damaged, preventing a proper seal when closed and thus a weak or no flush.
- Incorrect Height: The flush valve might be sitting too low, meaning the button linkage isn’t lifting it high enough.
- Water Level: An insufficient water level in the cistern means there isn’t enough water to create a strong flush. Check the water level marker inside the cistern. The water should typically reach about 1-2 cm below the overflow pipe. If it’s too low, the fill valve needs adjustment or repair.
Credit: taekwondoluxembourg.com
Troubleshooting Weak Or Incomplete Flushes
A flush that barely empties the bowl or stops mid-cycle is frustrating and ineffective. This often relates to the volume of water released or the efficiency of the flush valve.
Insufficient Water In Cistern
As mentioned, a low water level is a primary cause of weak flushes.
- Locate the Fill Valve: This is the mechanism that refills the cistern, usually with a float attached.
- Adjust the Float: Most float valves have an adjustment screw or clip that allows you to set the water level.
- Screw Adjustment: Turn the screw to raise or lower the float arm. Raising the float sets a higher water level.
- Clip Adjustment: Some floats have clips that can be moved up or down the arm.
- Check the Mark: Ensure the water level reaches the marked line inside the cistern (usually around 1-2 cm below the overflow pipe).
- Test Flush: Flush the toilet and observe if the water level is now adequate.
Warning: Never set the water level above the top of the overflow pipe, as this will cause continuous water loss.
Flush Valve Not Lifting High Enough
Even with the correct water level, if the flush valve isn’t lifted sufficiently, the flush will be weak.
- Adjust Linkage: If you have a rod system, the rod might need to be slightly longer or adjusted to lift the valve higher. If it’s a cable system, tighten the cable.
- Flush Valve Height: Some flush valves can be adjusted vertically. Check your toilet’s manual for specific instructions.
Clogged Flush Valve Or Siphon Jet
The flush valve itself can become clogged with debris or mineral deposits, hindering water flow.
- Isolate Water Supply: Turn off the water supply valve behind the toilet.
- Flush Toilet: Press the button to empty the cistern as much as possible.
- Access Flush Valve: Depending on your model, you may need to remove the flush valve assembly. This usually involves unscrewing a retaining nut at the bottom of the cistern from underneath.
- Clean the Valve: Inspect the valve seal and the valve body for debris. Clean thoroughly with a brush and water. Use a descaler if necessary, but rinse extremely well.
- Check Siphon Jet (Bowl): In the toilet bowl itself, at the bottom, there’s a small hole called the siphon jet. This hole injects water into the trapway to help start the siphonic action. If this hole is blocked with limescale, it can significantly weaken the flush. Use a small piece of wire or a stiff brush to clear it.
Worn Flush Valve Seal
The rubber seal at the base of the flush valve is critical. If it’s old, cracked, or deformed, it won’t seal properly when closed, leading to a slow leak into the bowl and a weak flush.
- Inspect the Seal: With the cistern empty and the flush valve removed, examine the rubber seal.
- Replace if Damaged: If the seal is worn, cracked, or brittle, it needs replacement. You can usually purchase a replacement seal specific to your flush valve model.
- Installation: Fit the new seal securely onto the flush valve. Reassemble the flush valve and reconnect the water supply.

Credit: www.indeepplumbing.com.au
Troubleshooting Dual-flush Button Issues
Dual-flush systems add complexity due to their two-button operation. Problems can arise with one button, both, or the mechanism that differentiates their function.
One Button Works, The Other Doesn’t
This typically points to an issue with the specific button or its corresponding linkage.
- Stuck Button: If one button is stuck, follow the troubleshooting steps for a non-depressing button for that specific button.
- Dislodged Linkage: The rod or cable connected to the non-working button might have detached. Open the cistern and check the connections.
- Internal Mechanism Failure: Dual-flush button assemblies often have internal mechanisms that differentiate the two buttons. If one part of this mechanism breaks, one button will cease to function. This usually requires replacing the entire dual-flush button assembly.
Buttons Stuck Together Or Jammed
Sometimes, the two buttons can become misaligned or jammed, preventing either from operating correctly.
- Remove Button Assembly: Carefully remove the entire dual-flush button assembly from the cistern lid.
- Inspect: Look for any debris caught between the buttons or within their housing. Check if the internal plungers or levers are bent or misaligned.
- Clean and Realign: Clean the assembly thoroughly. Gently try to straighten any bent parts. Ensure the buttons move freely within their housing before reinstalling.
- Reinstall: Refit the assembly, ensuring it’s seated correctly before tightening the retaining nut.
Incorrect Flush Volume (dual-flush)
If both buttons seem to work but provide the wrong flush volume (e. g. , the ‘full’ flush is weak, or the ‘half’ flush is too strong), it suggests an issue with the flush valve or its adjustment.
- Flush Valve Type: Most dual-flush systems use a specific type of flush valve designed to respond differently based on how long the button is pressed or which button is pressed.
- Adjustment: Some flush valves have adjustable settings for the dual-flush function. Consult your toilet’s manual to see if your model is adjustable and how to set it correctly.
- Faulty Flush Valve: The internal mechanism of the flush valve might be faulty, preventing it from performing the differentiated flushes correctly. This often requires replacing the entire flush valve.
Dealing With Concealed Cistern Push Plates
Concealed cisterns, where the workings are hidden behind a wall, present a different set of challenges. Accessing the components is more difficult, and troubleshooting often requires removing the push plate itself.
Accessing The Cistern Mechanism
The push plate is the primary interface. Removing it provides access to the flush actuator mechanism.
- Identify Plate Type: Plates are usually attached with screws (often hidden under a cover) or a clip system. Some high-end plates are magnetically attached.
- Remove Plate: Carefully follow the manufacturer’s instructions. This might involve pressing a release button, unscrewing visible or hidden screws, or gently prying the plate off.
- Locate Actuator: Once the plate is off, you’ll see the flush actuator rods or pneumatic tubes connecting to the cistern.
Push Plate Not Activating Flush
If the plate feels loose or unresponsive:
- Linkage Issues: The rods or cables connecting the plate to the flush valve might be disconnected, bent, or obstructed. Check their attachment points on both the plate mechanism and the flush valve.
- Pneumatic System Faults: If your system uses air pressure (pneumatic), check for leaks in the tubing or issues with the air bellows.
- Mechanical Faults: The internal levers or cams within the push plate mechanism might be broken or jammed.
Flush Valve Issues In Concealed Systems
Once the push plate is removed, you can inspect the flush valve. However, accessing the flush valve itself often requires removing an access panel in the wall or, in some cases, removing the entire cistern.
- Standard Flush Valve Problems: Issues like worn seals, debris, or incorrect water levels are common, just as with exposed cisterns.
- Professional Help: Due to the complexity of accessing concealed cisterns, it’s often advisable to call a plumber for anything beyond minor adjustments to the actuator rods.
When To Call A Professional Plumber
While many push-button toilet issues are DIY-friendly, there are times when professional expertise is essential.
- Lack of Confidence or Tools: If you’re uncomfortable working with plumbing or lack the necessary tools, it’s safer to call a professional.
- Concealed Cisterns: As mentioned, working on concealed cisterns can be complex and may require specialized knowledge and tools.
- Persistent Problems: If you’ve tried basic troubleshooting steps and the problem persists, a plumber can diagnose more complex internal issues.
- Cracked Cistern or Components: Any sign of cracks in the ceramic cistern or major plastic components necessitates professional assessment and likely replacement.
- Water Damage Concerns: If you suspect a leak that could cause water damage to your property, immediate professional intervention is recommended.
A plumber can quickly identify faulty components, access difficult-to-reach areas, and ensure repairs are done correctly, preventing further damage or recurring issues. For instance, a common issue they encounter is a corroded or broken flush valve seat, which requires specific parts and expertise to replace correctly.
Maintenance Tips For Push-button Toilets
Regular maintenance can prevent many common problems and extend the life of your toilet’s flushing mechanism.
- Regular Cleaning: Clean the cistern interior periodically (every 6-12 months) to remove limescale and debris. Use a mild cleaner and avoid abrasive materials.
- Check Water Level: Periodically ensure the water level in the cistern is correct.
- Button Check: Occasionally test both buttons (if dual-flush) to ensure they move freely.
- Listen for Leaks: Pay attention to any constant trickling sounds from the cistern, which might indicate a worn flush valve seal.
- Use Toilet Cleaners Wisely: Some harsh chemical toilet cleaners can degrade rubber seals over time. Opt for gentler cleaning methods.
Common Push Button Toilet Problems And Solutions
Here’s a quick reference table for common issues:
| Problem | Possible Cause(s) | Solution(s) |
|---|---|---|
| Button doesn’t depress | Obstruction, misalignment, broken internal part | Clean around button, tighten retaining nut, check/adjust linkage, replace button assembly. |
| Button loose/wobbly | Loose retaining nut | Tighten retaining nut under cistern lid. |
| Button depresses, no flush | Disconnected/bent linkage, faulty flush valve, low water | Reconnect/straighten linkage, check/clean/replace flush valve seal, adjust water level via fill valve. |
| Weak or incomplete flush | Low water level, flush valve not lifting high enough | Adjust fill valve float for higher water level, adjust linkage length, check/clean flush valve. |
| Dual-flush button not working | Dislodged linkage, internal button mechanism fault | Check/reconnect linkage, clean button assembly, replace dual-flush button assembly. |
| Continuous running water | Faulty fill valve, worn flush valve seal | Adjust/replace fill valve, replace flush valve seal. |
| Concealed cistern plate unresponsive | Linkage issue, pneumatic fault, mechanical fault | Remove plate, check actuator rods/tubes, inspect for leaks, repair/replace plate mechanism or flush valve assembly (often requires plumber). |
Frequently Asked Questions
How Often Should I Clean My Toilet Cistern?
It’s generally recommended to clean the inside of your toilet cistern every 6 to 12 months. This helps prevent the buildup of limescale, sediment, and other debris that can interfere with the flushing mechanism and affect performance. Use a mild cleaner and a soft brush, and ensure you rinse thoroughly afterwards.
Can I Adjust The Flush Strength On A Dual-flush Toilet?
Yes, most dual-flush toilets allow for adjustment of the flush strength, primarily by adjusting the water level in the cistern or the flush valve mechanism itself. Consult your toilet’s manual, as the method varies by manufacturer. Adjusting the float on the fill valve is a common way to set the overall water volume, which influences flush strength.
Some flush valves also have specific settings for dual-flush operation.
What Does It Mean If My Toilet Makes A Gurgling Sound After Flushing?
A gurgling sound after flushing can indicate a partial blockage in the drain line or the toilet trap. It suggests that air is being forced back through the trap as the water tries to drain. While not always an immediate emergency, it’s a sign that the toilet may not be flushing efficiently and could lead to a complete blockage if ignored.
Using a toilet plunger or a drain snake can often resolve minor blockages.
How Do I Know If I Need To Replace The Flush Valve?
You likely need to replace the flush valve if you experience persistent issues like a weak flush, the toilet constantly running (even after adjusting the fill valve), or if the flush valve seal is visibly worn, cracked, or deformed. If cleaning the flush valve and its seal doesn’t resolve the problem, replacement is usually the next step.
You can typically buy a replacement valve specific to your toilet model.
Is It Safe To Use Strong Chemical Cleaners Inside The Cistern?
While chemical cleaners can remove limescale, it’s advisable to use them sparingly, if at all, inside the cistern. Harsh chemicals can degrade the rubber seals and plastic components within the flushing mechanism over time, potentially leading to leaks and more significant problems.
Mild descalers or natural cleaning solutions like vinegar, followed by thorough rinsing, are often safer alternatives for routine maintenance.
A flush button that refuses to cooperate can be a perplexing issue, but by systematically working through the potential causes, from simple obstructions to worn internal components, most problems can be resolved. Understanding the mechanics of your specific toilet model is key.
For many, a loose nut, a bit of debris, or a misaligned rod will be the culprit, easily fixed with basic tools and a little patience. However, for more complex issues, especially those involving concealed cisterns or persistent problems, don’t hesitate to enlist the help of a qualified plumber.
Regular maintenance, including cleaning and checking water levels, will go a long way in ensuring your push-button toilet functions reliably for years to come.